How to Enable Antelope, PreSonus, Slate Digital, Focusrite and Apogee Audio Interface on macOS
An EliteMacx86 Exclusive Guide - This guide covers implementation of Antelope, PreSonus, Slate Digital, Focusrite and Apogee Audio Interface on macOS for Thunderbolt compatible systems.
Overview
Recently, we announced that we introduced a solution for these non-working interfaces and few other Thunderbolt devices on systems with macOS installed. And, we're very happy to announce a public release for this solution to all the users out there who can try and report the bugs for further development for this project.
For more information on the exact issue and compatibility, refer to the thread linked below.
Now you can use Antelope, PreSonus, Slate Digital, Focusrite and Apogee Digital Thunderbolt and FireWire Audio Interface and NAS on Custom PC Builds and Laptops with macOS Overview It has been so long since few Audio Interface from the brands like Antelope, PreSonus, Slate Digital, Focusrite...

www.elitemacx86.com
Requirements
The requirements for having this solution is pretty much the same as Thunderbolt. Few additional requirements has been outlined below.
| Hardware | Compatibility |
|---|
| CPU | VT-d Compatible |
| Motherboard/chipset | VT-d Compatible |
| Real Macs | 2012 and Later |
The very first step is to verify wether you have a supported CPU and Motherboard or not. To confirm the availability of VT-d, follow the steps below.
Visit the link below and select your processor variant.
Intel® product specifications, features and compatibility quick reference guide and code name decoder. Compare products including processors, desktop boards, server products and networking products.

ark.intel.com
Under Advanced Technology, make sure your processor supports "Intel® Virtualization Technology for Directed I/O (VT-d)"
Enabling Audio Support for Interface
The next step is to enable Audio for these interface. To enable Audio Support, follow the steps below.
STEP 1: Enabling VT-d
The very first step is to enable VT-d support for your system. To enable VT-d, follow the steps below.
1. On your target machine, boot the system into BIOS.
2. Under BIOS, find Intel VT-d. On some machine, the name can be simply VT-d. On few server motherboards, the option is hidden under Northbridge or Chipset Tab.
3. Set VT-d to Enabled.
4. Restart your system and boot into macOS.
STEP 2: Modifying the EFI Configuration
The next step is to modify the configuration to enable the Audio support. To enable Audio Support, follow the steps below.
For OpenCore
If you're using OpenCore, follow the steps below.
1. Mount your ESP.
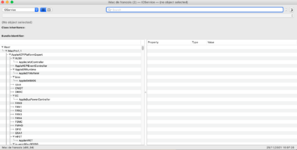
2. Go to EFI/OC/ directory and open your config.plist.
3. Go to Kernel Tab and uncheck "DisableIoMapper."
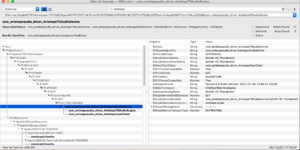
4. Go to NVRAM section and select "7C436110-AB2A-4BBB-A880-FE41995C9F82" under UUID list.
5. From Boot args, remove "dart=0."
6. Save your config.plist.
For Clover
If you're using Clover, follow the steps below.
1. Mount your ESP.
2. Go to EFI/OC/ directory and open your config.plist.
3. Go to Boot Tab and under boot args, remove "dart=0."
4. Go to Quirks Tab and uncheck "DisableIoMapper."
5. Save your config.plist.
STEP 3: Setting Up Drivers for your Audio Interface
The next step is to setup drivers for your Audio Interface. To setup the drivers, follow the steps below.
1. Remove the preinstalled launchers and drivers.
2. Visit your Interface manufacturer's website and download the appropriate drivers for your Audio Interface.
3. Install the required drivers for your Audio Interface.
STEP 4: Setting up Audio Interface
The next step is to setup Audio Interface. To setup your Audio Interface, follow the steps below.
1. Reset your Audio Interface twice.
2. Shutdown your Audio Interface.
3. Connect it to your System.
4. Restart the System.
Now the installation is complete!
Enjoy your Audio Interface on your system
") Notes:
Notes:
- For some manufacturer, you may need to signup for an account to access the downloads.
- For some Audio Interface, you need to download Launcher and Drivers. In case, if the Launcher has an option to install the drivers, just download the launcher.
- For Big Sur and Later, you may need to allow the loading of drivers from System Preferences>Security & Privacy.
- Use the latest drivers for your Audio Interface.
- A proper Thunderbolt Hotplug is required for a better functionality.
Project Status, Bugs and Further Development
As stated previously, we were supposed to bring the solution to public and with the release of this solution, there are few bugs which have been outlined below.
With some motherboards, when enabling VT-d, the entire Network feature is disabled such as Ethernet and WiFi. However, this issue is only limited to Big Sur. A current workaround is to use Catalina or any USB based WiFi/Ethernet Adapter. Another issue is on some motherboards, the USB ports are broken. We're still testing the project under several environments and hoping to make it more reliable for the users.
The old Unsupported Macs, i.e Macs from 2011 and below, which does not features VT-d, is still not supported by this solution and the only workaround as of now is to use macOS Sierra and the same is applicable for other machines which does not supports VT-d function.
AMD CPUs are still not supported by this solution and to overcome this issue, the second workaround is what works as of now.
If you can consider a contribution towards the forum for bringing this solution to you, a donation is more than welcome to support this project and help developers to keep the development in progress.
Regards,
EliteMacx86
 I use a Gigabyte Titan Ridge rev.1 (FW 43)