- Joined
- Jul 22, 2018
- Messages
- 9,248
- Motherboard
- Supermicro X11SPA-T
- CPU
- Intel Xeon W-3275 28 Core
- Graphics
- 2xAMD RX 580 8GB
- OS X/macOS
- 13.x
- Bootloader
- OpenCore (UEFI)
- Mac
- Mac mini
- MacBook Pro
- Mobile Phone
- Android
- iOS
Fix Pink Screen on Intel HD and UHD Graphics on macOS Sierra and Later on Desktops [Clover/OpenCore]
An EliteMacx86 Exclusive Guide - This guide covers fixing the pink screen on Intel HD and UHD Graphics on macOS Sierra and Later on Desktops.
Overview
Some users are having an issue of the pink screen after fixing their Graphics. This guide will fix the pink screen on your Hackintosh. This fix is for Hackintosh users who are having one of these above Graphics.
Before you start with this guide, get to know about the real issue. After fixing the Graphics, the QE/CI is available and the Graphics works. But the issue is the screen is totally pink and some lags and artifacts are there. This is happening with the HDMI connection.
In my previous post, I mentioned the fix which was to change the SMBIOS. Another fix was to use an RGB forcing method. However, both the fixes work and you get rid of the pink screen but the method doesn't seem solid to me.
When diving deep into the issue, I found what the exact issue was. When connecting HDMI, the connector is listed as a DP port. That's the cause of the pink screen. Once you change it to HDMI, the issue will be fixed.
The following Intel GPU is supported
Requirements
So assuming that you've fixed your Graphics, follow the steps below.
STEP 1: Checking Connectors in IOReg
1. Open your IOReg and type IGPU in the search bar. Sometimes, the IGPU node is available as GFX0. If the GPU rename has been done, it will be available as IGPU. If not, GFX0.
You should see something similar to the attached screenshot.

2. Once you have located the IGPU node, you can clear the search to get the complete node info.

3. If you check, in the above screenshot, we have some AppleIntelFramebuffer connectors listed. You need to locate your current connector which is driving your display. A simple way to find this out is to find the connector having AppleDisplay properties with display 0 sub-node. In our case, it is AppleIntelFramebuffer@2. Your system can have a different one. Make sure to locate the connector which drives your display and the idea to find it out is a connector having AppleDisplay properties.
4. Select the AppleIntelFramebuffer@2 from the left pane and you'll have the connectors and other properties and info listed.

5. If you check, in the above screenshot, we have some AppleIntelFramebuffer@2 selected. Now you need to find the value for the "connector-type" property. The above screenshot has a property of "<00 04 00 00>". This is the current connector type set originally. The connector type can have different values which are listed below.
So we are using HDMI but the connector is defined as DisplayPort which is the actual cause that I also mentioned earlier. We can use WEG's patching feature to change the connector type.
STEP 2: Changing the connector-type
All we need to do is to enable the port to which the active display is connected which is AppleintelFramebuffer@2 and then set the connector-type to HDMI resulting in fixing the issue.
Following are the listed properties which will be used in Devices/Properties in config.plist.
The modified properties will be the following

STEP 3: Restart your System
1. After making the changes, save your config.plist and restart your system. The pink screen should be fixed now.
To confirm these changes, open your IOReg again and look for the connector-type with the active display.

Now you will notice that the connector-type has been changed from <00 04 00 00> to <00 08 00 00> meaning from DisplayPort to HDMI.
Problem Reporting
Details:
An EliteMacx86 Exclusive Guide - This guide covers fixing the pink screen on Intel HD and UHD Graphics on macOS Sierra and Later on Desktops.
Overview
Some users are having an issue of the pink screen after fixing their Graphics. This guide will fix the pink screen on your Hackintosh. This fix is for Hackintosh users who are having one of these above Graphics.
Before you start with this guide, get to know about the real issue. After fixing the Graphics, the QE/CI is available and the Graphics works. But the issue is the screen is totally pink and some lags and artifacts are there. This is happening with the HDMI connection.
In my previous post, I mentioned the fix which was to change the SMBIOS. Another fix was to use an RGB forcing method. However, both the fixes work and you get rid of the pink screen but the method doesn't seem solid to me.
When diving deep into the issue, I found what the exact issue was. When connecting HDMI, the connector is listed as a DP port. That's the cause of the pink screen. Once you change it to HDMI, the issue will be fixed.
The following Intel GPU is supported
- Intel HD Graphics 530
- Intel HD Graphics 540
- Intel HD Graphics 550
- Intel HD Graphics 630
- Intel HD Graphics 640
- Intel HD Graphics 650
Requirements
| Graphics | Any of the above Supported Intel HD Graphics. |
| Kexts | Original Graphics kexts in S/L/E. |
| macOS Version | macOS Sierra or later. |
So assuming that you've fixed your Graphics, follow the steps below.
STEP 1: Checking Connectors in IOReg
1. Open your IOReg and type IGPU in the search bar. Sometimes, the IGPU node is available as GFX0. If the GPU rename has been done, it will be available as IGPU. If not, GFX0.
You should see something similar to the attached screenshot.
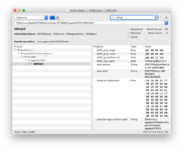
2. Once you have located the IGPU node, you can clear the search to get the complete node info.
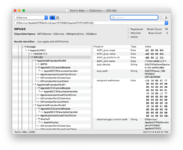
3. If you check, in the above screenshot, we have some AppleIntelFramebuffer connectors listed. You need to locate your current connector which is driving your display. A simple way to find this out is to find the connector having AppleDisplay properties with display 0 sub-node. In our case, it is AppleIntelFramebuffer@2. Your system can have a different one. Make sure to locate the connector which drives your display and the idea to find it out is a connector having AppleDisplay properties.
4. Select the AppleIntelFramebuffer@2 from the left pane and you'll have the connectors and other properties and info listed.
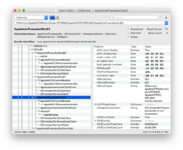
5. If you check, in the above screenshot, we have some AppleIntelFramebuffer@2 selected. Now you need to find the value for the "connector-type" property. The above screenshot has a property of "<00 04 00 00>". This is the current connector type set originally. The connector type can have different values which are listed below.
| Connectors | Value |
|---|---|
| Display Port | 00 04 00 00 |
| HDMI | 00 08 00 00 |
| DVI | 04 00 00 00 |
| LVDS (For Laptops) | 02 00 00 00 |
| Dummy port | 01 00 00 00 |
So we are using HDMI but the connector is defined as DisplayPort which is the actual cause that I also mentioned earlier. We can use WEG's patching feature to change the connector type.
STEP 2: Changing the connector-type
All we need to do is to enable the port to which the active display is connected which is AppleintelFramebuffer@2 and then set the connector-type to HDMI resulting in fixing the issue.
Following are the listed properties which will be used in Devices/Properties in config.plist.
- framebuffer-conX-enable = 01000000
- framebuffer-conX-type = 00080000
The modified properties will be the following
- framebuffer-conX-enable = 01000000
- framebuffer-conX-type = 00080000

STEP 3: Restart your System
1. After making the changes, save your config.plist and restart your system. The pink screen should be fixed now.
To confirm these changes, open your IOReg again and look for the connector-type with the active display.
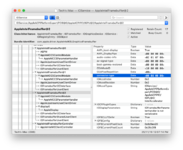
Now you will notice that the connector-type has been changed from <00 04 00 00> to <00 08 00 00> meaning from DisplayPort to HDMI.
Problem Reporting
Details:
- Intel HD Graphics model
- macOS version
- Copy of IOReg
- Kextcache output
- DPCIManager/Status
- About This Mac
- System Information/Graphics/Displays
- For Clover, compress EFI/Clover, exclude the themes folder.
- For OpenCore, compress EFI/OC.
- Do not include the complete EFI folder.
- Put all files in a folder with your name, compress files as Zip and attach files using site attachments only.
- Do not use any external links.
Last edited:


