How to Fix Intel WiFi and Bluetooth on macOS Sequoia and Later
This guide covers fixing Intel WiFi and Bluetooth on macOS Sequoia and Later using Clover and OpenCore. By following this guide, you'll be able to enable Intel based WiFi and Bluetooth on macOS Sequoia and Later using Clover or OpenCore Bootloader.This guide can be followed on macOS Sequoia as well as the previous macOS versions such as Sonoma or prior. The original guide for the Intel WiFi and Bluetooth has been linked below for reference:
GUIDE - How to Enable Intel WiFi and Bluetooth on macOS [Clover/OpenCore]
How to Enable Intel WiFi and Bluetooth on macOS [Clover/OpenCore] This guide describes how to enable Intel WiFi and Bluetooth on macOS using Clover and OpenCore. By following this guide, you'll be able to enable Intel WiFi and Bluetooth on your non-Apple computer running macOS using Clover or...
Overview
When it comes to WiFi/BT, a number of vendors tend to opt for the Intel WiFi/BT due to its high availability, faster performance and easy to integrate. Most of the OEM machines you'll see, including the Desktop Motherboards (WiFi/BT variant), its generally shipped with Intel WiFi. The Intel WiFi has been lasting for more than 10yrs and still counting. By default, only Atheros and Broadcom WiFi/BT are natively supported on macOS, with the Airport features. If you're an Apple user (especially, macOS), you might have already known that when it comes to macOS, a limited number of devices are supported. Either the driver should be provided by Apple itself or from the device vendor.Apple dropped the support for Atheros based WiFi cards since Mojave and the last macOS version to support the Atheros based WiFi cards (natively) was macOS High Sierra. After the discontinuance of the Atheros based cards, Apple still had active developments for the Broadcom based WiFi cards, which was majorly being used in Macs. Apple has been always selective and back then, there were Mac models with the Broadcom Ethernet chips as well. Apple has been using the Broadcom WiFi till date, including in their new Apple Silicon lineups. Despite the fact that Apple implemented several Intel based Ethernet chips, it never implemented the support for Intel based WiFi Cards, even in their new Mac lineups. The reason is unknown. One of the factor could be some of the hardware features which could be possible only with Broadcom or due to certain contractual requirements or easy implementation and learning from the past. Moreover, in the recent years, with the release of macOS Sonoma, Apple dropped support for a variety of Broadcom based WiFi cards. But the newer models are still in use and is being actively developed and maintained.
Although, it was never a problem for real Mac users, the non-Apple community had several struggles. Although, replacing the Intel WiFi card was easy on majority of the systems with a compatible card (such as Broadcom), some of the Notebooks and NUCs you'll see, comes with a soldered WiFi, so it was again a hassle to desolder and despite the desoldering the Intel WiFi, one could never find the Broadcom WiFi with that much of size to solder it back, hoping that it would work on macOS. Another issue to replace the Intel WiFi cards with a compatible was the availability. In several regions, its hard to find a Broadcom WiFi card which is compatible on macOS. Imagine, if the Intel WiFi worked OOTB or with the help of a community driven driver, how good it could be? A new life for systems running macOS on non-Apple computers. Seeing the widely adopted Intel WiFi cards on the non-Apple computers by OEM, a well known developer @zxytd started a project "AppleIntelWifiAdapter" with a ray of hope for Intel WiFi users on macOS. The project had initial findings and after years of waiting, this project was archived and further development moved to a new project called "OpenIntelWireless" aiming to provide support for Intel WiFi cards on macOS. If you're from the back era, you might have already known that Intel WiFi did not work until macOS High Sierra. Although, it was still in progress, the final release was at the time of macOS Catalina, which had a functional WiFi and the project was a huge success. Finally, users could utilize their Intel WiFi cards on macOS. Of course, it was not that perfect at the time of its initial release, but over the period of time, there has been tremendous support from the developer, adding support for newer models and fixing the bugs, making it reliable for the day to day use, in a production environment.
If you're reading this guide, you're probably familiar with the how Apple love to make changes in their macOS releases. This year, with the launch of Sequoia, there are some of the major changes in the Network stack and as a result, the Intel WiFi does not work on macOS Sequoia. This includes all Intel WiFi which were previously supported, prior to macOS Sequoia. Usually, the kext needs some update (backend) to include the support for a new macOS family so that it can work. However, it seems like the OpenIntelWireless developer @zxystd is busy with some other devs and no update has been possible yet.
For Intel WiFi, which is supported via third party kexts (AirPortitlwm and itlwm), it has been possible to utilize Intel WiFi cards which is shipped with variety of systems, on macOS. The OpenIntelWireless project offers two methods: AirPortitlwm, which is more of a native WiFi function (similar to native WiFi on real Macs) that uses the IO80211Family stack to support the native functions, with a few hicciups, but let's not forget that the project had numerous updates and improvements, making it reliable to use it on macOS. Although it provides certain Airport features such as AirDrop, etc., it lacks the performance and stability as compared to itlwm. The other method is itlwm, which utilizes the Apple's IOEthernet rather than the IO80211Family. Based on Open Source, it provides faster and stable performance as compared to Airportitlwm.
Currently, the Airportitlwm has not been updated for macOS Sequoia and as a result, it does not work at all. However, using the itlwm and Heliport, which uses an Ethernet interface does actually work on macOS Sequoia. However, as always, the itlwm lacks several functionalities such as Location, AirDrop. But at least it works, better than nothing
") For users who want to have high speed internet with stability, you should definitely opt for itlwm, if you do not care about the AirPort features. Its still wireless and who cares if it uses the IOEthernet.
For users who want to have high speed internet with stability, you should definitely opt for itlwm, if you do not care about the AirPort features. Its still wireless and who cares if it uses the IOEthernet.Talking about the Bluetooth, it works fine with the updated kexts. As the Bluetooth is on the USB bus, it has always worked upto an extent, before the OpenIntelWireless project. However, it was then not possible to turn on/off the Bluetooth Device and it had firmware issues. Now, with the project, a proper firmware is loaded onto the BT device and its also possible to turn on/off the Bluetooth within the macOS itself.
Requirements
Following are the requirements for enabling Intel WiFi on macOS. Please ensure you meet the requirements before proceeding with this guide.
| WiFi/ BT Hardware |
|
| macOS |
|
| Bootloader |
|
| Kexts |
|
| Tools |
|
If you're attempting a clean install or an upgrade, it is highly recommended to perform a clean install or the upgrade first before you follow this guide. In addition, this guide assumes that you have already mapped your USB Ports and have set the Bluetooth as Internal (255). See Mapping USB Ports for more information.
STEP 1: Setup BIOS
The very first step is to set up BIOS to have the Intel WiFi/BT enabled on your system. This is because there are a few systems that have the option to Enable WiFi/BT in BIOS which affects the functionality under macOS/OS X.1. On your target computer, boot to BIOS. Refer to your user manual for the BIOS Key
2. Enable WiFi/BT function.
3. Save & Exit Setup.
STEP 2: Verify the WiFi Detection
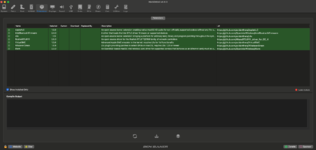
The next step is to verify whether the installed card is being detected under macOS or not. This step is required in order to ensure you're on the right track and you have the right card as per the compatibility list. If the Card is not detected, even following the guide correctly will not help to get it recognized. In addition, not all WWN slots are M.2. There are a few systems with cNVi slots, where even if you replace the card with a compatible one, the card will not be detected at all. This is because of the proprietary connectivity interface by Intel. This means the particular CNVi slot on the motherboard will accept only Intel-based WiFi/BT Cards therefore if you replace the card, you must verify the detection of the WiFi/BT module. To verify the WiFi/BT detection, follow the steps below.1. Download Hackintool from the Download section.
2. Open Hackintool.
3. Locate your WiFi module under the PCIe section in Hackintool. The WiFi module is usually listed as a Network Controller under the
Class and Subclass column:
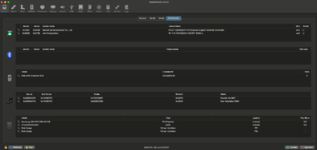
4. The BT can be verified in the Hackintool>USB section. In case, if you're unable to verify the BT using Hackintool, you can verify it from the System Report>Hardware>USB section:


Hackintool will report the firmware loaded for the Bluetooth but it seems to be a bug. The firmware loading status can be also verified from System Report>Bluetooth:


Moreover, the Card is currently recognized as Broadcom. This is another bug where if a correct firmware is not loaded, the system tries to load the Broadcom firmware by default. The issue persist since Monterey onwards. As a result, the Bluetooth does not function at all even with the appropriate kexts which was being used prior to macOS Sequoia and was fully functional.

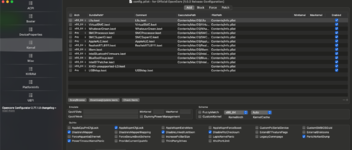
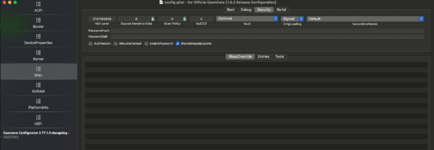
STEP 3: Add Required Kexts
The next step is to install the required kexts in order to enable WiFi and Bluetooth support.Due to the nature of complexity involved for enabling WiFi on macOS Sequoia and later, this step has been divided into two separate sections
Available Methods
There are essentially two methods to enable Intel WiFi on macOS Sequoia. As each method has different process involved, both the methods are described below in detail. Choose one of the method as per your preference.
| Kexts | Notes |
|---|---|
| itlwm |
|
| AirportItlwm |
|
Method #1: itlwm+HeliPort App
itlwm method is the standard method for enabling the Intel WiFi on macOS Sequoia and later. Using the itlwm method, you can enable the Intel WiFi with ease, without much need of any extra steps. This method is relatively easier than but has certain iServices limitations (such as Location, AirDrop and Handoff) will not work. To enable WiFi using itlwm, follow the steps below:
1. Download itlwm, IntelBluetoothFirmware, IntelBTPatcher and BlueToolFixup.
2. Mount your ESP.
3. For WiFi, copy
itlwm.kext to the EFI/OC/kexts directory and for Bluetooth, copy IntelBluetoothFirmware.kext, IntelBTPatcher.kext and BlueToolFixup.kext to the same (EFI/OC/Kexts) directory as well.
5. Open your config.plist and add
itlwm.kext for WiFi and for Bluetooth, IntelBluetoothFirmware.kext, IntelBTPatcher.kext and BlueToolFixup.kext entries in the Kernel>Add section of your config.plist.
NOTE: Your kext list and entries may differ as each system is different and will have different requirements.
STEP 4: Add Bluetooth Parameters
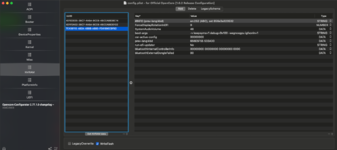
Once you have added the required keexts, the next step is to add the required parameters for Bluetooth functionality. Please note that this step is crucial and without adding these parameters, the Bluetooth firmware will fail to load. To add the Bluetooth parameters, follow the steps below:1. Assuming the config.plist is still open, add the following keys under the 7C436110-AB2A-4BBB-A880-FE41995C9F82 UUID list in the NVRAM section of your config.plist:
Key: bluetoothExternalDongleFailed
Value: 00
Type: DATA
Key: bluetoothInternalControllerInfo
Value: 00000000 00000000 00000000 0000
Type: DATA

2. Navigate to the Delete section and add the following keys under the 7C436110-AB2A-4BBB-A880-FE41995C9F82 UUID list in the NVRAM section of your config.plist:
- bluetoothExternalDongleFailed
- bluetoothInternalControllerInfo

5. Save your config.plist
NOTE: Values and letters are case sensitive.
STEP 5: Install and configure Heliport
When using the itlwm method, you'll also need to install HeliPort. HeliPort acts as a WiFi Client. To install HeliPort, follow the steps below:1. Download HeliPort.dmg.
2. Mount the DMG.

3. Move HeliPort to the Applications folder.

4. To ensure Heliport automatically launches at each boot, add Heliport to the Login items using Settings>General>Login Items & Extensions.

STEP 6: Boot using the new Configuration
Once you're done with the above steps, you'll need to boot with the updated configuration. Simply restart your system. It is recommended to reset NVRAM twice at least.Connecting to WiFi Network
As itlwm uses IOEthernet to function, the native WiFi icon will not work becuase itlwm does not use IO80211Family. To connect to your choice of the network, follow the steps below:1. From the Menubar, click on the Heliport Client icon. If there's no icon, open Heliport from the Applications folder.
2. Click on the network name (SSID) and Connect to your preferred WiFi network.

When prompted, enter your network password.

You should be now connected to your preferred network:

Heliport also have Network Preferences to give you control over the networks. You can arrange the networks in the order you want, can remove the network and view the network password (if saved).

NOTE: See itlwm Boot Arguments for a list of supported boot arguments.
Method #1: itlwm+HeliPort App
itlwm method is the standard method for enabling the Intel WiFi on macOS Sequoia and later. Using the itlwm method, you can enable the Intel WiFi with ease, without much need of any extra steps. This method is relatively easier than but has certain iServices limitations (such as Location, AirDrop and Handoff) will not work. To enable WiFi using itlwm, follow the steps below:
However, this method may appear as lengthy and complex but if you stick to the guide and follow it carefully, you should have no issues. Before you jump in, let's understand this method in detail. The steps are similar as of enabling Broadcom WiFi for macOS Sequoia and Later. The only difference is that you will have to spoof the Intel WiFi device to make it see as a Broadcom WiFi device to allow the root patching. If you're curious to know, why spoofing is needed, that is because since the release of macOS Sonoma, Apple has removed support for certain Broadcom WiFi models and has even got rid of the Brcm kexts these WiFi models were relying on. With the OCLP development, it was possible to block the newer IOSkywalkFamily and inject an old working one from macOS Ventura along with the other Brcm kexts. an effort to make these devices work back on thew newer macOS versions.
To understand the background and the patching process, please see Enabling Broadcom WiFi on macOS for more info.
The next step is to spoof the Intel WiFi device so that the OCLP sees it as a Broadcom WiFi device which is required by OCLP to patch the system volume. Please note that we do suggest spoofing other properties such as device-id, vendor-id etc. In order to patch the system volume, OCLP only checks for IOName for patching the particular device in question. Therefore, its not necessary to spoof the device-id, vendor-id or inject other spoofing parameters. Although the Broadcom kexts will never attach due to the fact those are missing from the systems and as long as they're not injected via OC, the Kernel Panic shouldn't likely happen. However, to be on the safe side, it would be more than enough to just spoof the IOName for the particular Intel WiFi device in question.
Not only its sufficient enough for patching but it makes more sense to just spoof the IOName, leaving the other device properties as default.
The development for Intel Wireless project has been kinda stopped now. Hence, there are no new releases for macOS Sequoia. The last version known to work is with macOS Sonoma. It has been almost 5 months since macOS Sequoia was announced but there has been no new releases for the Intel Wireless so far.
As you might be aware that, with the release of macOS Sonoma, Apple removed support for Broadcom WiFi cards. As a result, the Brcm kexts and framework required by the Broadcom WiFi cards were also removed as a result. If you own an Intel WiFi card, you're probably aware that Apple never shipped any of their Mac models with Intel/WiFi Cards. However, seeing the OpenIntelWireless project was introduced and two kinds of kexts were introduced at a later stage. The AirportItlwm requires these kexts and frameworks to function properly.
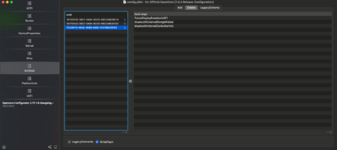
Verifying the WiFi and Bluetooth
The next step is to verify whether the WiFi and BT are working or not. Follow the steps to verify the WiFi function.The built in System Preferences>WiFi will not have information as the itlwm uses IOEthernet instead of IO80211 and has its own management via Heliport.


Despite the WiFi works, it will not appear/show in the System Preferences>WiFi. However, using the Network, the details are shown.


.png")


Recommended Configuration
The following configurations are the only valid configurations. Anything else is likely wrong and should not be used.| Function | Configuration | Kext Install Location |
|---|---|---|
| WiFi |
|
|
| Bluetooth |
|
|
Troubleshooting
On some systems, it might be possible that despite the WiFi is detected, it doesn't work. See for more information
Last edited: