How to Fix Intel WiFi and Bluetooth on macOS Sequoia and Later
This guide covers fixing Intel WiFi and Bluetooth on macOS Sequoia and Later using Clover and OpenCore. By following this guide, you'll be able to enable Intel based WiFi and Bluetooth on macOS Sequoia and Later using Clover or OpenCore Bootloader.This guide must be followed on macOS Sequoia and later only. If you're running a prior version of macOS, there is an original Intel WiFi/BT guide that works with ease up to macOS Sonoma and has been linked below for reference:
GUIDE - How to Enable Intel WiFi and Bluetooth on macOS [Clover/OpenCore]
How to Enable Intel WiFi and Bluetooth on macOS [Clover/OpenCore] This guide describes how to enable Intel WiFi and Bluetooth on macOS using Clover and OpenCore. By following this guide, you'll be able to enable Intel WiFi and Bluetooth on your non-Apple computer running macOS using Clover or...
Overview
When it comes to WiFi/BT, a number of vendors tend to opt for the Intel WiFi/BT due to its high availability, faster performance and seamless integration. Most of the OEM machines you'll see, including the Desktop Motherboards (WiFi/BT variant), its generally shipped with Intel WiFi. It's also a great choice when it comes to light weight and slim notebooks as the WiFi/BT chip can be soldered on to the logic board, making the notebook compact, yet powerful. The Intel WiFi has been lasting for more than 10yrs and still counting. By default, only Atheros and Broadcom WiFi/BT are natively supported on macOS, with the Airport features. If you're an Apple user (especially, macOS), you might have already known that when it comes to macOS, a limited number of devices are supported. Either the drivers are supplied by Apple itself or from the device vendor.Apple dropped the support for Atheros based WiFi cards since Mojave and the last macOS version to support the Atheros based WiFi cards (natively) was macOS High Sierra. After the discontinuance of the Atheros based cards, Apple still had active developments for the Broadcom based WiFi cards, which was majorly being used in Macs. Apple has been always selective and back then, there were Mac models with the Broadcom Ethernet chips as well. Apple has been using the Broadcom WiFi till date, including in their new Apple Silicon lineups. Despite the fact that Apple implemented support for several Intel based Ethernet chips, it never implemented the support for Intel based WiFi Cards, even in their new Mac lineups. One of the reasons could be writing the drivers for Intel WiFi from scratch, which could have been difficult and when they have the years of experience with the Broadcom chips aiming to fix bugs and bring improvements, it ultimately made more sense to continue with Broadcom instead of writing new drivers for Intel WiFi, that may not only increases the chances for new potential bugs but could also have led to a bad user experience. The other factor could be some of the hardware features which could be only possible with Broadcom or due to certain contractual requirements or easy implementation or seamless integration with their logic board, and learning from the experience. Moreover, in the recent years, with the release of macOS Sonoma, Apple dropped support for a variety of Broadcom based WiFi cards. But the newer models are still in use and is being actively developed and maintained.
Although, it was never a problem for real Mac users, the non-Apple community had several struggles. Although, replacing the Intel WiFi card was easy on majority of the systems with a compatible card (such as Broadcom), some of the Notebooks and NUCs you'll see, comes with a soldered WiFi, so it was again a hassle to desolder and despite the desoldering the Intel WiFi, one could never find the Broadcom WiFi with that much of size to solder it back, hoping that it would work on macOS. Another issue to replace the Intel WiFi cards with a compatible was the availability. In several regions, its hard to find a Broadcom WiFi card which is compatible on macOS. Imagine, if the Intel WiFi worked OOTB or with the help of a community driven driver, how good it could be? A new life for systems running macOS on non-Apple computers. Seeing the widely adopted Intel WiFi cards on the non-Apple computers by OEM, a well known developer @zxytd started a project "AppleIntelWifiAdapter" with a ray of hope for Intel WiFi users on macOS. The project had initial findings and after years of waiting, this project was archived and further development moved to a new project called "OpenIntelWireless" aiming to provide support for Intel WiFi cards on macOS. If you're from the back era, you might have already known that Intel WiFi did not work until macOS High Sierra. Although, it was still in progress, the final release was at the time of macOS Catalina, which had a functional WiFi and the project was a huge success. Finally, users could utilize their Intel WiFi cards on macOS. Of course, it was not that perfect at the time of its initial release, but over the period of time, there has been tremendous support from the developer, adding support for newer models and fixing the bugs, making it reliable for the day to day use, in a production environment.
If you're reading this guide, you're probably familiar with the fact how Apple love to make changes in their macOS releases. This year, with the launch of Sequoia, there are some of the major changes in the Network stack and as a result, the Intel WiFi does not work on macOS Sequoia. This includes all Intel WiFi which were previously supported, prior to macOS Sequoia. Usually, the kext needs some update (backend) to include the support for the new macOS family so that it can work. However, it seems like the OpenIntelWireless developer @zxystd is busy with some other devs and no update has been possible so far.
For Intel WiFi, which is supported via third party kexts (AirPortitlwm and itlwm), it has been possible to utilize Intel WiFi cards on variety of systems that are shipped with such cards.
which is shipped with variety of systems, on macOS. The OpenIntelWireless project offers two methods: AirPortitlwm, which is more of a native WiFi function (similar to native WiFi on real Macs) that uses the IO80211Family stack to support the native functions, with a few hicciups, but let's not forget that the project had numerous updates and improvements, making it reliable to use it on macOS. Although it provides certain Airport features such as AirDrop, etc., it lacks the performance and stability as compared to itlwm. The other method is itlwm, which utilizes the Apple's IOEthernet rather than the IO80211Family. Based on Open Source, it provides faster and stable performance as compared to Airportitlwm.
Currently, the Airportitlwm has not been updated for macOS Sequoia and as a result, it does not work at all. However, using the itlwm and Heliport, which uses an Ethernet interface does actually work on macOS Sequoia. However, as always, the itlwm lacks several functionalities such as Location, AirDrop. But at least it works, better than nothing
") For users who want to have high speed internet with stability, you should definitely opt for itlwm, if you do not care about the AirPort features. Its still wireless and who cares if it uses the IOEthernet.
For users who want to have high speed internet with stability, you should definitely opt for itlwm, if you do not care about the AirPort features. Its still wireless and who cares if it uses the IOEthernet.Talking about the Bluetooth, it works fine with the updated kexts. As the Bluetooth is on the USB bus, it has always worked upto an extent, before the OpenIntelWireless project. However, it was then not possible to turn on/off the Bluetooth Device and it had firmware issues. Now, with the project, a proper firmware is loaded onto the BT device and its also possible to turn on/off the Bluetooth within the macOS itself.
Compatibility
Almost all Intel WiFi/BT modules are compatible with the third-party, community developed kexts. Refer to the thread linked below for more information on Intel WiFi/BT compatibility:WiFi Compatibility List for OS X and macOS [Broadcom, Atheros, Intel and Realtek]
Following are the list of compatible and non-compatible WiFi models for Mac.
For Broadcom
GUIDE - How to Enable Broadcom WiFi and Bluetooth on macOS [Clover/OpenCore]
How to Enable Broadcom WiFi and Bluetooth on macOS [Clover/OpenCore] This guide describes how to enable Broadcom WiFi and Bluetooth on macOS using Clover and OpenCore. By following this guide, you'll be able to enable Broadcom WiFi and Bluetooth on your non-Apple computer running macOS using...
GUIDE - Enabling WiFi Support for Atheros Based WiFi Adapters
As of the first release of macOS Mojave, Apple has removed the support for Atheros based WiFi adapters by removing the AirPortAtheros40.kext file from the IO80211Family.kext/Contents/Plugins so if you have been using one of those cards you need to add the missing AirPortAtheros40.kext back to...
GUIDE - How to Enable Intel WiFi and Bluetooth on macOS [Clover/OpenCore]
How to Enable Intel WiFi and Bluetooth on macOS [Clover/OpenCore] This guide describes how to enable Intel WiFi and Bluetooth on macOS using Clover and OpenCore. By following this guide, you'll be able to enable Intel WiFi and Bluetooth on your non-Apple computer running macOS using Clover or...
Broadcom
| Vendor | Model | Form Factor | Standard | Range | Chipset | VEN... |
|---|
- EliteMacx86
- atheros broadcom compatibility hackintosh intel mac macos os x qualcomm realtek wifi
- Replies: 22
- Forum: Hardware Compatibility
Requirements
Following are the requirements for enabling Intel WiFi/BT on macOS Sequoia. Please ensure you meet the requirements before proceeding with this guide.| WiFi/ BT Hardware |
|
| macOS |
|
| Bootloader |
|
| Kexts |
|
| Tools |
|
If you're attempting a clean install or an upgrade, it is highly recommended to perform a clean install or the upgrade first before you follow this guide. In addition, this guide assumes that you have already mapped your USB Ports and have set the Bluetooth as
Internal (255). See Mapping USB Ports for more information.STEP 1: Setup BIOS
The very first step is to set up the BIOS to have the Intel WiFi/BT enabled on your system. This is because there are a few systems that have the option to Enable/Disable WiFi/BT in BIOS which affects the functionality under macOS.1. On your target computer, boot to BIOS. Refer to your system/motherboard user manual for the BIOS Key.
2. Enable WiFi/BT function.
3. Save & Exit Setup.
STEP 2: Verify the WiFi/BT Detection
The next step is to verify whether the installed card is being detected under macOS or not. This step is required in order to ensure you are on the right track and have the right card as per the compatibility list. If the Card is not detected, even following the guide correctly will not help you to drive the card. In addition, not all WWN slots are M.2. There are a few systems with cNVi slots, where even if you replace the card with a compatible one, the card will not be detected at all. This is because of the proprietary connectivity interface by Intel. This means the particular CNVi slot on the motherboard will accept only Intel-based WiFi/BT Cards.Moreover, in some cases, there is whitelist on certain systems which will affect the functionality of the WiFi/BT as replacing the card with another model will simply not work due to the whitelist. Therefore if you replace the card, you must verify the detection of the WiFi/BT module. To verify the WiFi/BT detection, follow the steps below:
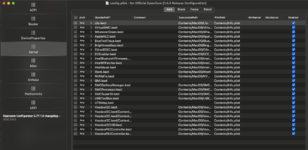
1. Download Hackintool.
2. Open Hackintool.
3. Locate your WiFi module under the PCIe section in Hackintool. The WiFi module is usually listed as a Network Controller under the
Class and Subclass column:
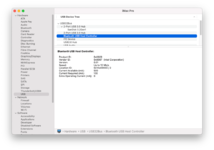
4. The BT can be verified in the Hackintool>USB section. In case, if you're unable to verify the BT presence using Hackintool, you can verify it from the System Report>Hardware>USB section or even via IOReg:


Hackintool will report the firmware loaded for the Bluetooth but there seems to be a bug. The firmware loading status can be also verified from System Report>Bluetooth:


Moreover, the BT gets recognized as Broadcom instead of Intel. This is another bug where if a correct firmware is not loaded, the system tries to load the Broadcom firmware by default. The issue persist since Monterey onwards. As a result, the Bluetooth does not function at all even with the appropriate kexts injected via OpenCore which was fully functional on macOS Sonoma and prior.

STEP 3: Add Required Kexts
The next step is to install the required kexts in order to enable WiFi and Bluetooth support. Due to the nature of complexity involved for enabling WiFi on macOS Sequoia and later, this step has been divided into two separate sections i.e. WiFi and Bluetooth.I. WiFi
Available Methods
There are essentially two methods to enable Intel WiFi on macOS Sequoia. As each method has different process involved, both the methods are described below in detail. Choose one of the method as per your preference:| Kexts | Notes |
|---|---|
| itlwm |
|
| AirportItlwm |
|
 QUICK INFO: Do not use itlwm.kext and AirportItlwm.kext together.
Method #1: itlwm+HeliPort App
itlwm+HeliPort method is the standard method for enabling Intel WiFi on macOS Sequoia and later. Using the itlwm method, you can enable the Intel WiFi with ease, without the need of any extra steps. This method is relatively easier than the second method but has certain iServices limitations and functions (such as Location, AirDrop and Handoff) will not work. The advantage of this method is that it uses the native (vanilla) network kexts and frameworks, and downgrading the system kexts or root patching isn't required in order to function. To enable WiFi using itlwm, follow the steps below:1. Download itlwm.
2. Extract the kext.
3. Mount your ESP.
4. Depending on your bootloader,
Clover:
1. If you're using Clover, copy
itlwm.kext to EFI/Clover/Kext/Others directory.OpenCore
1. If you're using OpenCore, copy
itlwm.kext to the EFI/OC/kexts directory.
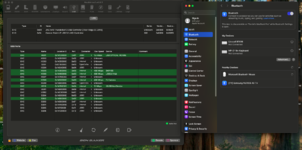
2. Open your config.plist and add
itlwm.kext entry in the Kernel>Add section of your config.plist:
5. Save your config.plist.
NOTE: Your kext list and entries may differ as each system is different and will have different requirements.
STEP 2: Install and configure Heliport
When using the itlwm method, you'll also need to install HeliPort. HeliPort acts as a WiFi Client. To install HeliPort, follow the steps below:1. Download HeliPort.
2. Mount the DMG.

3. Move HeliPort to the Applications folder:

4. As macOS Sequoia handles the app differently due to the strict gatekeeper policy, it is recommended to open HeliPort.app from the Applications folder at first run. This step is just to ensure you have a hassle free experience, the next time you login into macOS. If the Gatekeeper settings are the default settings and have not been changed, you may get a warning message when launching the App for the first time as shown below:

5. Click on Done and then open System Settings and navigate to Privacy & Security section.
6. Scroll down and under the Security Section, a message should be displayed stating "HeliPort" was blocked to protect your Mac. Simply click on Open Anyway. When prompted, click on Open Anyway confirmation dialogue box:


7. When promoted, enter your password and then press enter key and HeliPort will now execute normally afterwards.

8. HeliPort will open and shall ask you for the App update preference (if its the first time you're opening the App). Choose the update settings as per your preference and the dialogue box will be closed automatically.

9. You'll probably get this warning once the HeliPort is launched for the first run which is normal as itlwm is not loaded yet:

Simply, click on Quit HeliPort. Now, when you open the HeliPort app next time (either manually or automatically at login), the HeliPort will be executed normally without the gatekeeper permission issue.
10. To ensure Heliport automatically launches on each boot, add HeliPort to the Login items under Settings>General>Login Items & Extensions:

11. Quit System settings and eject HeliPort.dmg.
STEP 3: Boot using the new Configuration
Once you have performed all the above steps, you'll need to boot with the updated configuration. Simply restart your system for the applied changes to take effect. It is recommended to reset NVRAM twice at least.STEP 4: Connecting to WiFi Network
As itlwm usesIOEthernet to function, the native WiFi icon will not work because itlwm does not use IO80211Family stack. To connect to your choice of the network, follow the steps below:1. From the menubar, click on the Heliport Client icon. If there's no icon, open Heliport from the Applications folder.
2. Click on the network name (SSID) and connect to your preferred WiFi network.

3. When prompted, enter your network password:
You should be now connected to your preferred network:

Heliport also have Network Preferences to give you control over the networks. You can arrange the networks in the order you want, can remove the network and view the network password (if saved).

In addition, you can configure the update related settings in the Network Preferences>General Tab:

NOTE: See itlwm Boot Arguments for a list of supported boot arguments.
Verifying the WiFi Functionality
The next step is to verify whether the WiFi is functioning or not. Follow the steps below to verify the WiFi to ensure its functioning as expected:The built in System Preferences>WiFi will not have information as the itlwm uses
IOEthernet instead of IO80211 and has its own management via Heliport:

Despite the WiFi works, it will not appear in the System Preferences>WiFi either:

However, using the Network settings, the details are shown in System Preferences>Network:


Menubar
- Verify the WiFi discoverability in Heliport:
Browser
- Verify the speed tests for 2.4GHz and 5GHz Network:
- Verify whether the itlwm is loading in IOReg:
Method #2: AirportItlwm
Airportitlwm is the second method for enabling the Intel WiFi on macOS Sequoia and later. Although this method has several advantages (such as iServices, Location services and partial AirDrop) as compared to itlwm method, this method may appear as lengthy and complex but if you stick to the guide and follow it carefully, you should have no issues. Before you jump in, let's understand this method in detail. The steps are similar as of enabling Broadcom WiFi for macOS Sequoia and Later. The only difference is that you will have to spoof the Intel WiFi device to make it see as a Broadcom WiFi device to allow the root patching. If you're curious to know, why spoofing is needed, that is because OCLP has support for patching Broadcom and Atheros based cards only, and not Intel. When you try to run root patch using OCLP on systems with Intel WiFi, with the intention to use AirportItlwm on macOS Sequoia or later, OCLP will simply state "No patches available for root patching".Since the release of macOS Sonoma, Apple has removed support for certain Broadcom WiFi models and has even got rid of the Brcm kexts these WiFi models were relying on. With the OCLP development, in an effort to make these devices work back on thew newer macOS versions, it is possible to block the native IOSkywalkFamily and inject an old working one from macOS Ventura along with the Brcm kexts and other required frameworks for its functioning.
Just to let you know, currently there is no proper release of AirportItlwm for macOS Sequoia and the release intended for macOS Sonoma or prior won't even load on macOS Sequoia. This is because, AirportItlwm has the dependencies on these kexts and frameworks in order to function properly. However, due to the removal of these kexts frameworks and the change in the API, the AirportItlwm needs an update to match the requirements, which doesn't seem to be happening anytime soon. The development for Intel Wireless project has been kinda stopped now. Hence, there are no new releases for macOS Sequoia. The last version known to work is with macOS Sonoma. It has been almost 5 months since macOS Sequoia was announced but there has been no new releases for the Intel Wireless so far.
However, using OCLP, its possible to downgrade the native kexts and replace it with macOS Ventura, which will let you to use AirportItlwm in macOS Sequoia. The only downside is that the kexts will be of macOS Ventura (the WiFi related kexts and also the AirportItlwm) and the system will be root patched which shouldn't likely create any problems.
To understand the background and the patching process, please see Enabling Broadcom WiFi on macOS for more info.
This method should be followed by users who require such function. Do NOT use this method with itlwm.
To enable WiFi using the AirportItlwm method, follow the steps below:
STEP 1: Spoof WiFi Device
The next step is to spoof the Intel WiFi device so that the OCLP sees it as a Broadcom WiFi device which is required by OCLP to patch the system volume. As Broadcom based WiFi cards utilizes theIOSkywalkFamily, which is also required by AirportItlwm in order to load, this step is absolutely mandatory. Without the downgrade of the IOSkywalkFamily and other relying frameworks, AirportItlwm will not load and to load, these requirements must be met. Please note that we do not suggest spoofing other properties such as device-id, vendor-id etc. In order to patch the system volume, OCLP only checks for IOName for patching the particular device in question. Therefore, it is not necessary to spoof the device-id, vendor-id and spoofing other parameters are likely not needed. Not only its sufficient enough for patching but it makes more sense to just spoof the IOName, leaving the other device properties as default. The Broadcom kexts will never attach due to the fact its missing from the system and as long as they're not injected via OpenCore, the Kernel Panic shouldn't likely happen. However, to be on the safe side, it would be more than enough to just spoof the IOName for the particular Intel WiFi device in question.Although it is possible to manually mount the snapshot and perform the necessary tasks i.e. downgrade the required kexts and frameworks and you will no longer require to spoof the WiFi device as Broadcom. However, it's quite complex and not that feasible. Moreover, in certain cases, if a mistake happens from user's side, it may lead the system into un-bootable state. Due to such reasons, OCLP approach is preferred instead. To spoof the Intel WiFi device as Broadcom, follow the steps below:
1. Download Hackintool.
2. Open Hackintool.
3. Locate your WiFi module under the PCIe section in Hackintool. The WiFi module is usually listed as a Network Controller under the
Class and Subclass column:
4. Right click on the PCI path in the Device Path column and select Copy Device Path.
5. Mount your ESP.
6. Open config.plist and navigate to the DeviceProperties section.
7. Click on the + button and add the device path that you copied from Hackintool.
8. Add the following key to the device path you added:
Key: IOName
Value: pci14e4,43a0
Type: String

NOTE: Values and letters are case sensitive.
STEP 2: Add Required Kexts
1. Download IOSkywalkFamily.kext, IO80211FamilyLegacy.kext, and AirportItlwm.kext.2. Extract the Kexts.
3. Mount your ESP.
4. Copy
IOSkywalkFamily.kext, IO80211FamilyLegacy.kext, and AirportItlwm.kext to the EFI/OC/Kexts directory:
5. Open your config.plist and add
IOSkywalkFamily.kext, IO80211FamilyLegacy.kext, and AirportItlwm.kext entries in the Kernel>Add section of your config.plist:
6. You'll have to prevent the child kext
AirPortBrcmNIC.kext from loading. This can be achieved either by (i) disabling the kext entry; (ii) removing the kext from the IO80211FamilyLegacy.kext/Contents/Plugins directory andremoving the related kext entry to keep the config.plist more tidy. In addition, you'll need to specify the MinKernel and MaxKernel as shown below to ensure that the kext only loads on the appropriate version of macOS, if using the same EFI for booting multiple macOS versions:

NOTES:
- The AirPortItlwm.kext must be from the Ventura version.
- If you're using a USB Ethernet Adapter that utilizes the
ECM Protocol, you'll have to addECM-Override.kextto prevent Kernel Panic as Apple's DriverKit stack usesIOSkywalkFamilyfor ECM based Adapters. In addition, you'll need to specify the MinKernel to 24.0.0 to ensure that the kext only loads on macOS Sequoia and later. This step is completely optional and only required if you wish to use USB to Ethernet adapter/dongle that utilizes the ECM protocol. - Your kext list and entries may differ as each system is different and will have different requirements.
If you wonder why Ventura version, its because Ventura was the last macOS version to support Broadcom based WiFi cards whose support was later removed since macOS Sonoma and now only limited BCM WiFi models are supported, proprietary and onboard soldered cards in Mac lineups.
STEP 3: Block Required Kexts
The next step is to block the nativeIOSkywalkFamily.kext from loading. This step is required for AirportItlwm method. Blocking the IOSkywalkFamily.kext in macOS Sequoia will allow us to manually inject a previous version of IOSkywalkFamily.kext(from Ventura), therefore allowing us to downgrade. This is required because, unless you don't block this kext, you'll not be able to inject the prior version of IOSkywalkFamily.kext, and while the previous version of IOSkywalkFamily.kext is injected and the native IOSkywalkFamily is left unblocked, it will throw an error when booting macOS due to duplicate kexts with slight differences. To block the IOSkywalkFamily.kext, follow the steps below:1. Assuming the config.plist is still open, add the following under
Kernel>Block section of your config.plist. In addition, you'll need to specify the MinKernel to 24.0.0 to ensure that the kext is only blocked on macOS Sequoia.| Arch | Identifier* | Comment | MinKernel | MaxKernel | Strategy | Enabled |
|---|---|---|---|---|---|---|
| Any | com.apple.iokit.IOSkywalkFamily | Allow IOSkywalkFamily Downgrade | 24.0.0 | Exclude | YES |

STEP 4: Disable Secure Boot Model
Once you have blocked theIOSkywalkFamily.kext, the next step is to disable the Secure Boot Model. To disable the Secure Boot Model, follow the steps below:1. Assuming the config.plist is still open, set the
SecureBootModel to Disabled under the Misc>Security section of your config.plist.
STEP 5: Disable Apple Mobile File Integrity
Once you have disabled the Secure Boot Model, the next step is to disable the Apple Mobile File Integrity (AMFI). You can either use a kext or boot arg to disable the AMFI (never both). Depending on your choice, choose one from below:
I. Using Kext
To disable AMFI using kext, follow the steps below:1. Assuming the ESP is still mounted, copy
AMFIPass.kext to the EFI/OC/kexts directory:
2. Assuming the config.plist is still open, add
AMFIPass.kext entry in the Kernel>Add section of your config.plist. In addition, you'll need to specify the MinKernel and MaxKernel as shown below to ensure that the kext only loads on the appropriate version of macOS, if using the same EFI for booting multiple macOS versions.
II. Using Boot Args
To disable the AMFI using boot args, you can follow the steps below:1. Assuming the config.plist is still open, add
amfi=0x80 to the boot-args key under the 7C436110-AB2A-4BBB-A880-FE41995C9F82 UUID list in the NVRAM section of your config.plist: QUICK INFO: When using
 amfi=0x80 boot arg, certain applications may not respond and eventually crash (such as Firefox) as reported by @svan71. However, AMFIPass.kext is more suitable in such case scenarios.
STEP 6: Disable System Integrity Protection (SIP)
Once you have added the required boot args, the next step is to disable the System Integrity Protection. To disable the SIP, follow the steps below:1. Assuming the config.plist is still open, set the
csr-active-config to 03080000 as the DATA value for root patching.
2. Save your config.plist.
 CAUTION: Do NOT enable the SIP after root patching, else the WiFi will not longer function. The SIP must remain either partially or completely disabled for the downgraded kexts and required frameworks to load.
STEP 7: Boot using the new Configuration
Once you're done with the above steps, you'll need to boot with the updated configuration. Simply restart your system. It is recommended to reset NVRAM twice at least.When you boot with the new configuration, the system will show that the WiFi is enabled as the required kexts are injected. However, you won't be able to find and/or connect to any network:


Neither the WiFi Networks are available from the Menubar:

If you check the IOReg, you'll find that neither the AirportItlwm nor IOSkywalkFamily are loading:

However, Also, it would be good to check if the IOName spoof is reflected properly to start the patching:

STEP 8: Uninstall OCLP
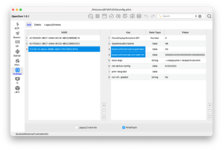
If you have made any previous attempt in order to fix the WiFi and have run root patching, its recommended to run the uninstaller first to remove the stale .plist, launchagents and also prevent the OCLP from halting when executing OCLP to patch the system volume. To uninstall OCLP, follow the steps below:1. Download OpenCore Legacy Patcher (OCLP) Uninstaller.
2. Run the Uninstaller


3. When prompted, enter your password and continue with the uninstallation:

4. Once uninstalled, click on Close.


STEP 9: Install OCLP
The next step is to install OCLP. To install OCLP, follow the steps below:1. Download OpenCore Legacy Patcher (OCLP).
2. Run the OCLP installer.


3. When prompted, enter your password and continue with the installation:


4. Once installed, click on Close.

STEP 10: Patch System Volume
The next step is to patch the system volume using OCLP in order to downgrade the network kexts and frameworks that is required for the functioning of the Intel WiFi, so that the AirportItlwm can load. To patch the system using OCLP, follow the steps below:2. Navigate to the Applications directory and right-click on OpenCore-Patcher.app and select Show Original.
3. Right-click on OpenCore-Patcher and click on Open and you'll see something similar to the screenshot attached below:

3. Click on Post Install Root Patch and you'll see something similar to the screenshot attached below:
As you can see, the OCLP has automatically detected what patch to apply.

 QUICK INFO: If the SIP is enabled, you may notice a message stating "SIP is Enabled". If you notice that, make sure to disable it as described in STEP #1.
Click on Start Root Patching and it will start patching the system volume. You'll see something similar to the screenshot attached below:


Once OCLP finishes patching the system volume, it will prompt to reboot. When OCLP asks you to reboot, click on Ignore and do not reboot the system yet.

Click on Return to Main Menu and Quit OCLP.
STEP 11: Disable WiFi Spoof
Although,IOName is still present, which is required by OCLP as it run checks against the Device ID (particularly IOName) for selecting and applying the patchset and may not cause any harm, its highly suggested to remove the spoof to avoid any sort of conflicts. To disable the WiFi spoof, follow the steps below:1. Mount your ESP.
2. Open the config.plist and navigate to DeviceProperties section.
3. Select the WiFi device entry and click on - button to delete the entry:


4. Save your config.plist
STEP 12: Restart your System
After performing all the above steps, restart your system for the applied changes to take effect. It is recommended to reset NVRAM twice at least.Once you're done with the above steps, you'll need to boot with the updated configuration. Simply restart your system. It is recommended to reset NVRAM twice at least.
As you may notice, the country code is set to ZZ. However, once its connected to the preferred network, it will change to the correct country code. You can even set your preferred country code via
As you might be aware that, with the release of macOS Sonoma, Apple removed support for Broadcom WiFi cards. As a result, the Brcm kexts and framework required by the Broadcom WiFi cards were also removed as a result. If you own an Intel WiFi card, you're probably aware that Apple never shipped any of their Mac models with Intel/WiFi Cards. However, seeing the OpenIntelWireless project was introduced and two kinds of kexts were introduced at a later stage. The AirportItlwm requires these kexts and frameworks to function properly.
Verifying the WiFi
The next step is to verify whether the WiFi is working or not. Follow the steps below to verify the WiFi function.System Report
- Verify the WiFi Interface in About This Mac>System Report>Wi-Fi:

System Preferences
- Verify WiFi discoverability in System Preferences>Network:


System Report
- Verify the WiFi Interface connection with 2.4GHz and 5GHz in About This Mac>System Report>Wi-Fi:


Menubar
- Verify connected WiFi Networks and Other Networkshttps://web.archive.org/web/20260406234540/https://elitemacx86.com/attachments/screenshot-2025-05-09-at-6-07-37 am-min-png.9400/


Menubar
- Verify the network details such as signal strength and channel number using the Alt key.


IOReg
- Verify AirPort_BrcmNIC and AirPort_Brcm43xxLLSkywalkInterface is loading in IOReg

Browser
- Verify the speed tests for 2.4GHz and 5GHz Network


II. Bluetooth
Although the BT is integrated in the WiFi module, it utilizes the USB bus and requires separate kexts to function. To enable Bluetooth support, you'll need to add Intel Bluetooth kexts. As the Bluetooth steps are universal and unrelated to that of WiFi, the steps for enabling Bluetooth would be the same, regardless of the method you use to enable WiFi (either itlwm or AirportItlwm). To enable Bluetooth for your Intel WiFi/BT module, follow the steps below:STEP 1: Add Required Kexts
To install the kexts, follow the steps below:1. Download IntelBluetoothFirmware, IntelBTPatcher and BlueToolFixup.
2. Extract the kexts.
2. Mount your ESP.
3. Depending on your bootloader,
Clover:
If you're using Clover, copy IntelBluetoothFirmware.kext, IntelBTPatcher.kext and BlueToolFixup.kext to EFI/Clover/Kext/Others directory.
OpenCore
If you're using OpenCore, copy
IntelBluetoothFirmware.kext, IntelBTPatcher.kext, and BlueToolFixup.kext to the EFI/OC/kexts directory.
4. Open your config.plist and add
IntelBluetoothFirmware.kext, IntelBTPatcher.kext, and BlueToolFixup.kext entries in the Kernel>Add section of your config.plist.
STEP 2: Add Bluetooth Parameters
Once you have added the required kexts, the next step is to add the required parameters so that the firmware can load. Please note that this step is crucial and without adding these parameters, the Bluetooth firmware will fail to load. To add the Bluetooth parameters, follow the steps below:1. Open your config.plist and add the following keys under the
7C436110-AB2A-4BBB-A880-FE41995C9F82 UUID list in the NVRAM section of your config.plist:Key: bluetoothExternalDongleFailed
Value: 00
Type: DATA
Key: bluetoothInternalControllerInfo
Value: 00000000 00000000 00000000 0000
Type: DATA

2. Navigate to the Delete section and add the following keys under the
7C436110-AB2A-4BBB-A880-FE41995C9F82 UUID list in the NVRAM section of your config.plist:- bluetoothExternalDongleFailed
- bluetoothInternalControllerInfo

3. Save your config.plist
CAUTION: Values and letters are case sensitive.STEP 3: Boot using the new Configuration
Once you have performed all the above steps, you'll need to boot with the updated configuration. Simply restart your system for the applied changes to take effect. It is recommended to reset NVRAM twice at least.Verifying the Bluetooth Functionality
The next step is to verify whether the BT is functional or not. Follow the steps below to verify the BT to ensure its functioning as expected:

Despite the WiFi works, it will not appear/show in the System Preferences>WiFi. However, using the Network, the details are shown.


.png")
System Report
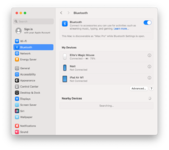
- Verify the Bluetooth details (Address, Firmware Version) in About This Mac>System Report>Bluetooth:

- Verify the Bluetooth USB Host Controller in About This Mac>System Report>USB:

System Preferences
- Verify Bluetooth discoverability in System Preferences>Bluetooth

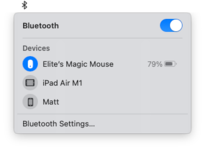
Menubar
- Verify connected Bluetooth Devices


Hackintool
- Verify WiFi and Bluetooth Firmware Loading in Hackintool>System>Peripherals

- Verify IntelBluetoothFirmware is loading in IOReg. You can find the IntelBluetoothFirmware under one of the HSXX ports under XHC.


Recommended Configuration
The following configurations are the only valid configurations. Anything else is likely wrong and should not be used.| Function | Configuration | Kext Install Location |
|---|---|---|
| WiFi |
|
|
| Bluetooth |
|
|
Miscellaneous
Despite Apple VTD is enabled, macOS fails to find any Ethernet interface. This is because we've downgraded the IOSkywalkFamily. As the system used for demonstration is having I225-V, the easiest way is to useAppleIGC.kext to enable the ethernet functionality back. This is also useful for AMD systems where VT-d is completely absent.When applying supplemental updates, make sure to disable AirPortItlwm to block from loading or the system will throw a kernel panic when the update is processed and finishes booting. You can enable it later once you're logged in and also apply the OCLP rootpatch after the update.
Troubleshooting
On some systems, it might be possible that despite the WiFi is detected, it doesn't work. See below for more information:https://elitemacx86.com/threads/how-to-fix-wifi-detected-but-not-working-on-macos.1833/
Attachments
-
 Screenshot 2024-09-25 at 5.26.51 AM-min.png77.8 KB · Views: 674
 -
 Screenshot 2024-09-25 at 5.19.40 AM-min.png87.5 KB · Views: 1,314
 -
 Screenshot 2024-09-25 at 5.00.45 AM-min.png83.3 KB · Views: 689
 -
 Screenshot 2024-09-25 at 4.59.54 AM-min.png46.5 KB · Views: 653
 -
 Screenshot 2024-09-25 at 4.59.58 AM-min.png7.2 KB · Views: 586
Last edited: