- Joined
- Jul 22, 2018
- Messages
- 8,361
- Motherboard
- Supermicro X11SPA-T
- CPU
- Intel Xeon W-3275 28 Core
- Graphics
- 2xAMD RX 580 8GB
- OS X/macOS
- 13.x
- Bootloader
- OpenCore (UEFI)
- Mac
- Mac mini
- MacBook Pro
- Mobile Phone
- Android
- iOS
How to Change CPU Name in About This Mac
This guide describes how to fix unknown CPU Name in About This Mac. You can also use this guide to change the CPU Name in About This Mac. The guide works for both, Clover and OpenCore. By following this guide, you'll be able to fix the "Unknown CPU" in About This Mac.
Overview
Although purely cosmetic, on a few systems, typically AMD and newer Intel CPUs does not have a native support in macOS/OS X. Due to this, the CPU isn't recognized correctly and is reported as "Unknown" Processor in About This Mac and in System Report. However, this does not has an impact in terms of performance, but it is still good to have the CPU name displayed instead of "Unknown". To fix the Unknown CPU in About in This Mac, follow the steps below.
Requirements
Following are the requirements for fixing the unknown CPU in About This Mac on macOS. Please ensure you meet the requirements before proceeding with this guide.
OpenCore
If you're using OpenCore as a bootloader, follow the steps below to change the CPU Name.
Method #1: Manual Method
Using the manual method, you can change the CPU Name without the need for any extra tools. However, beginner users can find this method a bit difficult. New users are advised to use Method #2. To change the CPU Name using the "Manual Method" follow the steps below.
1. Download Lilu and RestrictEvents
2. Mount your ESP.
3. Copy both the kexts to

4. Open your config.plist and add the

5. Assuming the config.plist is still open, add
TIP: You can also use NVRAM Variable and achieve the same effect. Simply add the following entry under the 4D1FDA02-38C7-4A6A-9CC6-4BCCA8B30102 UUID list in the NVRAM section of your config.plist.
NOTES:
7. Save your config.plist
8. Restart your system for the applied changes to take effect. It is recommended to reset NVRAM twice at least.
Method #2: Using CPU-Name Tool
Using the CPU-Name tool from corpnewt, you can change the CPU Name. This method is a lot easier and more friendly for beginners. To change the CPU Name, follow the steps below.
1. Download Lilu and RestrictEvents
2. Mount your ESP.
3. Copy both the kexts from the
4. Install Command Line Tools, if you haven't already.
5. Open the Terminal and execute the following commands. When prompted, enter your password.
You'll see something similar to the following as an output of the operation:

6. Type

and you'll see something like below

7. Drag and drop the

You'll see that the config.plist has been selected now. You can change the config.plist anytime, by pressing

8. Type

9. Type

As you can see, there are currently 3 options to set the CPU Type which are described below. The CPU Type is set in SMBIOS section of your config.plist.

Processor Types
10. Depending on the CPU

Once the Processor Type is set, it will reflect the changes in the Main Menu. As you can see, now the Processor Type has been set to 0x0F01 (3841) as per the Processor Type Table.

11. Type

Here, you can either use the CPU brand string to set the CPU Name as per your system by using the

12. Depending upon the option you would like to use, set the CPU Name. In our case, we would go with the manual route.

Once set, the new CPU Name will reflect in the Main Menu.

NOTE: If you have mistyped the CPU Name or want to change it again or want to start it over, you can use 3 to clear CPU Name, Rev CPU and the Processor Type.
13. Type


14. Quit Terminal
15. After performing all the above steps, restart your system for the applied changes to take effect. It is recommended to reset NVRAM twice at least.
NOTE: Regardless of the Method, either manual or using the CPU Name tool, the Core Count must be set correctly for AMD Systems to show the CPU brandstring otherwise, if set incorrectly, the CPU name may shown as Unknown.
Verifying the CPU Name
The next step is to verify whether the CPU Name is changed or not. Follow the steps below to verify the CPU Name.
About This Mac

System Report

This guide describes how to fix unknown CPU Name in About This Mac. You can also use this guide to change the CPU Name in About This Mac. The guide works for both, Clover and OpenCore. By following this guide, you'll be able to fix the "Unknown CPU" in About This Mac.
Overview
Although purely cosmetic, on a few systems, typically AMD and newer Intel CPUs does not have a native support in macOS/OS X. Due to this, the CPU isn't recognized correctly and is reported as "Unknown" Processor in About This Mac and in System Report. However, this does not has an impact in terms of performance, but it is still good to have the CPU name displayed instead of "Unknown". To fix the Unknown CPU in About in This Mac, follow the steps below.
Requirements
Following are the requirements for fixing the unknown CPU in About This Mac on macOS. Please ensure you meet the requirements before proceeding with this guide.
| CPU |
|
| SMBIOS |
|
| Kexts |
|
| Tools |
|
OpenCore
If you're using OpenCore as a bootloader, follow the steps below to change the CPU Name.
Method #1: Manual Method
Using the manual method, you can change the CPU Name without the need for any extra tools. However, beginner users can find this method a bit difficult. New users are advised to use Method #2. To change the CPU Name using the "Manual Method" follow the steps below.
1. Download Lilu and RestrictEvents
2. Mount your ESP.
3. Copy both the kexts to
EFI/OC/Kexts directory. 4. Open your config.plist and add the
RestrictEvents.kext entry for the same in the Kernel>Add section of your config.plist.5. Assuming the config.plist is still open, add
revcpu=1 to the boot-args key under the 7C436110-AB2A-4BBB-A880-FE41995C9F82 UUID list in the NVRAM section of your config.plist.TIP: You can also use NVRAM Variable and achieve the same effect. Simply add the following entry under the 4D1FDA02-38C7-4A6A-9CC6-4BCCA8B30102 UUID list in the NVRAM section of your config.plist.
- Key* = revcpu
- Value = 1
- Type = NUMBER
| Key* | Value | Type |
|---|---|---|
| revcpu | 1 | NUMBER |
| revcpuname | Your CPU Name | STRING |
NOTES:
- If you don't add any value for revcpuname, the CPU brand string will be taken from CPUID otherwise. If you want to use the original CPU brand string, we recommend you not add this key.
- If you're using revpatch=sbvmm (either via bootarg or the NVRAM), the CPU Name may change to the default, based on SMBIOS. You'll have to use the revcpuname=xxxx property. Where, the xxx represents your CPU Name.
- If you don't want to inject the property using Device Properties, you can use the same patch using
revcpu=0(Intel Default) orrevcpu=1(Non-Intel default) andrevcpuname=xxxxin boot-args in your config.plist, where thexxxxrepresents your CPU Name. See adding boot args for more info. 4D1FDA02-38C7-4A6A-9CC6-4BCCA8B30102:revpatch,4D1FDA02-38C7-4A6A-9CC6-4BCCA8B30102:revcpu,4D1FDA02-38C7-4A6A-9CC6-4BCCA8B30102:revcpunameand4D1FDA02-38C7-4A6A-9CC6-4BCCA8B30102:revblockNVRAM variables work the same as the boot arguments, but have lower priority.- Do NOT use both, use either boot arg (recommended) or the NVRAM.
1537 (for 1, 2, 4 and 6 Core CPUs) and 3841 (for 8+ Core CPUs) under PlatformInfo>DataHub-Generic section of your config.plist7. Save your config.plist
8. Restart your system for the applied changes to take effect. It is recommended to reset NVRAM twice at least.
Method #2: Using CPU-Name Tool
Using the CPU-Name tool from corpnewt, you can change the CPU Name. This method is a lot easier and more friendly for beginners. To change the CPU Name, follow the steps below.
1. Download Lilu and RestrictEvents
2. Mount your ESP.
3. Copy both the kexts from the
RELEASE directory to the EFI/OC/Kexts directory. You'll also need to add the kext entries in the Kernel section of your config.plist.4. Install Command Line Tools, if you haven't already.
5. Open the Terminal and execute the following commands. When prompted, enter your password.
Bash:
#Clone CPU-Name
git clone https://github.com/corpnewt/CPU-Name

#Move to the directory
cd CPU-Name

#Modify permission
chmod +x CPU-Name.command

#Run CPU-Name
./CPU-Name.command
You'll see something similar to the following as an output of the operation:
Code:
Cloning into 'CPU-Name'...
remote: Enumerating objects: 146, done.
remote: Counting objects: 100% (63/63), done.
remote: Compressing objects: 100% (54/54), done.
remote: Total 146 (delta 32), reused 17 (delta 9), pack-reused 83
Receiving objects: 100% (146/146), 72.19 KiB | 1.60 MiB/s, done.
Resolving deltas: 100% (75/75), done.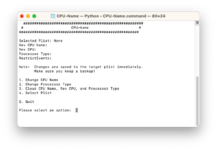
6. Type
4 and press enter key to select the config.plist for changing the CPU Name.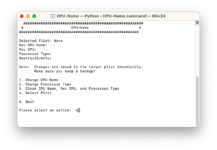
and you'll see something like below
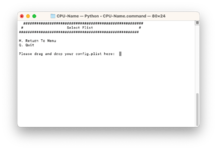
7. Drag and drop the
config.plist from the EFI/Clover (Clover) and EFI/OC (OpenCore) directory to the CPU-Name Terminal Window and press enter key. If you have your EFI in some other directory, you can drag and drop the config.plist from your preferred location.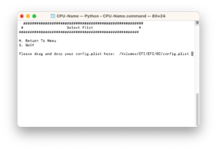
You'll see that the config.plist has been selected now. You can change the config.plist anytime, by pressing
4 key.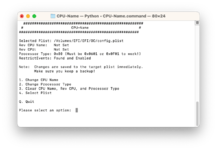
8. Type
3 and press enter key to clear CPU Name, Rev CPU, and Processor Type. This might be useful if you have used the script earlier or have tried to set the CPU Name manually.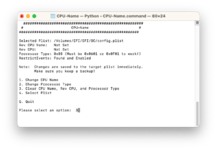
9. Type
2 and press enter key to change the processor type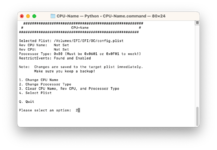
As you can see, there are currently 3 options to set the CPU Type which are described below. The CPU Type is set in SMBIOS section of your config.plist.
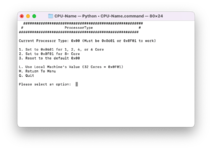
Processor Types
| Options | Notes |
|---|---|
| 1 | Sets the Processor Type to 0x0601 (1537) in SMBIOS. Suitable for 1, 2, 4 and 6 Core CPUs. |
| 2 | Sets the Processor Type to 0x0F01 (3841) in SMBIOS. Suitable for 8+ Core CPUs. |
| L | Sets the Processor Type as per the System in SMBIOS |
10. Depending on the CPU
Core Count, select the appropriate Processor Type. If you're not aware of the CPU specification, it would be best to use L option as it will use your system value to determine the Core Count and set the Processor Type accordingly. In our case, we'll be using the option 2 as per the table, to set the Processor Type to 0x0F01 (3841).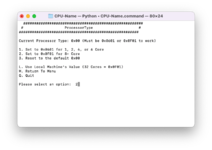
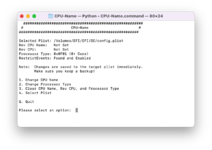
Once the Processor Type is set, it will reflect the changes in the Main Menu. As you can see, now the Processor Type has been set to 0x0F01 (3841) as per the Processor Type Table.
11. Type
1 and press enter key to change the CPU Name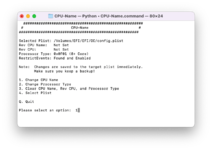
Here, you can either use the CPU brand string to set the CPU Name as per your system by using the
L option (default option) or you can also manually enter the desired CPU Name.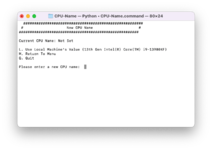
12. Depending upon the option you would like to use, set the CPU Name. In our case, we would go with the manual route.
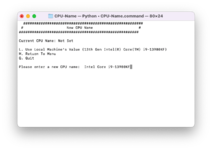
Once set, the new CPU Name will reflect in the Main Menu.
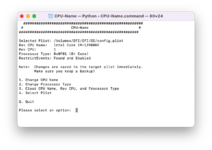
NOTE: If you have mistyped the CPU Name or want to change it again or want to start it over, you can use 3 to clear CPU Name, Rev CPU and the Processor Type.
13. Type
Q and press enter key to quit CPU Name.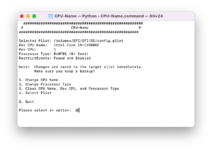
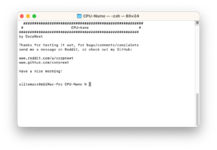
14. Quit Terminal
15. After performing all the above steps, restart your system for the applied changes to take effect. It is recommended to reset NVRAM twice at least.
NOTE: Regardless of the Method, either manual or using the CPU Name tool, the Core Count must be set correctly for AMD Systems to show the CPU brandstring otherwise, if set incorrectly, the CPU name may shown as Unknown.
Verifying the CPU Name
The next step is to verify whether the CPU Name is changed or not. Follow the steps below to verify the CPU Name.
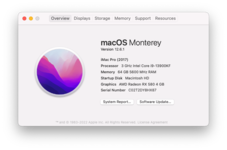
About This Mac
- Verify the CPU Name right next to the Processor in About This Mac
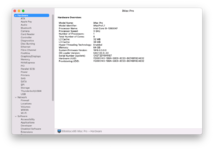
System Report
- Verify the Processor Name in About This Mac>System Report
Last edited:
