How to Disable Unsupported NVMe Drives on macOS [Clover/OpenCore]
This guide covers disabling unsupported NVMe Drives on macOS and is supported by both, i.e. Clover and OpenCore bootloaders. By following this guide, you'll be able to disable the unsupported NVMe Drive for booting macOS.
Overview
With a few NVMe Drives, some users may experience a Kernel Panic when booting the macOS installer, before reaching the installation stage. Although there could be several underlying causes for a Kernel Panic, this panic is related to NVMe Drive used in the target system. This can also be seen using the verbose mode:
With the introduction of macOS Sierra, it is possible to use NVMe Drives for macOS. However, additional patches are required due to specific models being supported in Sierra. With these patches, you can utilize any NVMe Drive under Sierra. Interestingly, with the release of macOS High Sierra, there is native support of NVMe Drives for macOS and the NVMe works out of the box without any tweak or specific configuration and there is no longer a need for these patches to utilize an NVMe drive. This means, most of the aftermarket NVMe drives can be used on macOS.
However, with the introduction of NVMe Drives, a few of the NVMe Controllers are not compatible with any macOS/OS X version and do not work out of the box despite having native support for NVMe. These SSDs are known to cause random Kernel Panics and it is not even possible to boot the macOS/OS X installer on a few certain SSDs (such as PC711, and BC711, PC601, P31 from SK Hynix) when installed in the target system. The system throws an immediate Kernel Panic before you can reach the macOS/OS X installer. In addition, performing a clean installation of macOS on these SSDs is also not possible. This situation is not only limited to Samsung, but includes other OEM brands such as SKHynix, Liteon, and PLEXTOR. Due to such an issue, it is very disappointing when it comes to Laptop and OEM users as they're enforced to either use an external drive or replace the existing drive with a recommended drive at an additional cost to have peace of mind. However, going with the drive replacement comes at the cost of additional effort of assembly and disassembly of the target system, which can be sometimes difficult for Laptop users, especially if you're a newbie.
Moreover, if you try to install macOS on a different target drive (such as an external drive), the macOS/OS X installer will still throw Kernel Panic, before reaching the installation stage. Therefore, you must disable these NVMe drives using one of the methods described in this guide.
The steps mentioned below are only valid if your system has a Kernel Panic relating to the NVMe and will not work if your system has a Kernel Panic due to some other cause. Please check the verbose log to ensure you're in the right direction.
Requirements
Following are the requirements for patching APIC Table on macOS. Please ensure you meet the requirements before proceeding with this guide.
Assumptions
This guide assumes that you have already some experience with the following. Having some of the following experience can be really helpful when following the guide.
- Existing Windows Install
- macOS/OS X Bootable USB with a properly configured EFI
- Basic config.plist editing skills
- Basic MaciASL usage
- Basic Clover/OpenCore knowledge
- Basic knowledge of installing/injecting kexts
Available Methods for Disabling Unsupported NVMe Drives
There are essentially three methods you might employ to avoid this:
- disable the card in BIOS (but not all laptop BIOS implementations provide such an option)
- disable the card in in ACPI as per this guide: https://www.tonymacx86.com/threads/guide-disabling-discrete-graphics-in-dual-gpu-laptops.163772/
OR
- inject a few properties on the graphics device that prevent the base VESA drivers from loading
It is the third/last method mentioned that this guide will cover.
There are essentially three methods available for disabling the Unsupported NVMe Drives for macOS on your target system.
This guide will cover all the three methods as mentioned above and you can choose one of the method as per your choice.
All three methods have been described below. You can choose one of the methods based on your preference to disable the unsupported NVMe Drive(s) on macOS.
Method #1: Using Boot Args
Using Boot Args, you can disable the Unsupported NVMe. This method is a lot easier and more friendly for newbie users. However, with this method, all internal NVMe will be disabled completely except for the external one. To disable the Unsupported NVMe using the Boot Arg Method, follow the steps below.
1. Mount your ESP
2. Depending on your bootloader,
For Clover
1. Open your config.plist using any XML editor from
2. Add
3. Save
For OpenCore
1. Open your config.plist using any XML editor from the
2. Add
3. Save
3. Restart your system for the applied changes to take effect. It is recommended to reset NVRAM twice at least.
Method #2: Using Device Properties
Method #3: Using Hotpatch
Using the Hotpatch method, you can
STEP 1: Determining the ACPI path of your NVMe device(s)
In order to disable the NVMe Drive(s) on the target system using the Hotpatch method, you must first determine the ACPI path that describes where your SSD is located in the ACPI namespace. You can use Windows Device Manager, or advanced users can determine it from IOReg. Both methods are described below. This is the most important step and is the root and therefore the ACPI Path must be accurate in order for the guide to work. Without the correct ACPI path, the guide simply won't work.
Because this guide is intended to be used prior to installation, it will make use of Windows as most of the users have Windows already installed. To find the ACPI path, follow the steps below
1. Open Device Manager either using Windows Search or using This PC>Device Manager

2. Expand

3. Select

4. Under the Details Tab, find the


If you have more than one NVMe SSD in the target system, you must find the ACPI path for each one.
NOTE: It is also possible that your SSD has no ACPI identity. However, such a situation is probably rare on Intel-based systems, but common on AMD systems, but in that case, you may be able to determine only the ACPI identity of the parent (in the case of my NUC, the parent is _SB.PCI0.RP13), and slightly different SSDT would have to be created. If you don't see "BIOS device name", the SSD path is probably without one or more ACPI identities. In that case, look for "Location paths" and note down the path that starts with "ACPI(_SB_)". Be sure to read "Examples with incomplete ACPI identities" for additional information and instructions. See fixing missing ACPI device for more information.
STEP 2: Modifying the SSDT
Once you have obtained the ACPI path, you're ready to disable the NVMe by modifying the sample SSDT. Typically, the modification consists of changing the ACPI path only. The rest of the values in the SSDT does not need to be changed. To modify the SSDT, follow the steps below.
1. Based on Rehabman's class-code technique, download SSDT-NVME-DISABLE.aml.
2. Download the MaciASL of your choice.
3. Extract the MaciASL and move it to the Applications folder.
4. Open the downloaded
5. Now you need to change the ACPI Path in the SSDT to match yours. You can either manually replace these values or you can also use Find and Replace option in MaciASL using
Before changing:
After changing:
The path shown above
If your SSD had no ACPI identity (eg. no ACPI identity for the M.2 port/device), you would need to create one. For example, if the OEM had left out the PXSX identity, it would have been required that I add one:
I don't know what is displayed in Windows Device Manager in that case, although it is predictable what ioreg would look like. Of course, the idea here is to create the SSD before installing macOS, so let me know if you have a situation with no ACPI identity for the SSD.
And if you have multiple NVMe SSDs, you must create a _DSM method for each. For example, my NUC also has a M.2 port at RP09 for an SSD. Currently, I have an SM951/AHCI installed there, so it is not NVMe. But if it was an NVMe drive, my SSDT would have to modified to include a _DSM method for it as well:
6. Click on Compile and look for errors in the Compiler Summary. If there's an error, fix it and again click on Compile.

7. Save the changes to the SSDT using the

STEP 4: Installing the SSDT
Now you can install the
1. Mount your ESP.
2. Depending on your bootloader,
For Clover:
If you're using Clover, copy the
For OpenCore:
If you're using OpenCore, copy
3. Save your
STEP 5: Restarting your System
After performing all the above steps, restart your system for the applied changes to take effect. It is recommended to reset NVRAM twice at least.
NOTE: If you're a Clover user and using SortedOrder in your
Verifying the Spoof
The next step is to verify whether the NVMe is disabled or not. Follow the steps below to verify the .
Hackintool

When using the Boot Arg method, you'll see something like the following:

Disk Utility

System Report

When using the Boot Arg method, you'll see something like the following:

IOReg

When using the Boot Arg method, you'll see something like the following:

Incomplete ACPI Identities
As mentioned in "Determining the ACPI path of your NVMe device(s)" above, your SSD path may be incomplete therefore without ACPI identities that lead all the way to the leaf node of the SSD. It is not possible to inject properties without a full ACPI path available (not even with config.plist/Devices/Arbitrary). In this case, we must complete the missing ACPI identity(s) for each node in the path including the leaf node that represents the SSD.
This is a simple example that shows an ACPI identity all the way to the parent of the SSD, but the SSD leaf node is without an ACPI identity:


We can derive the path of the parent from ACPI(_SB_)#ACPI(PCI0)#ACPI(POP4) as _SB.PCI0.POP4, but the leaf node representing the SSD, #PCI(000), we will need to define ourselves as it doesn't exist in the OEM ACPI code.
And here is a bit more complex example of the SSD behind a PCI bridge. The PCI bridge, #PCI(0800), is without an ACPI identity as is the SSD, #PCI(000), itself:
The path to the parent of the PCI bridge can be derived from ACPI(_SB_)#ACPI(PCI0)#ACPI(PEG0)#ACPI(PEGP) as _SB.PCI0.PEG0.PEGP, but for the #PCI(0800)#PCI(0000), we must create the ACPI identity.
The result is as follows:
Existing _DSM Methods
This method uses a _DSM method in an SSDT to inject the properties and it is possible that your OEM already defined a
Although you can patch DSDT (or any OEM SSDT that may have the offending _DSM), it is a lot easier to use a patch in Clover or OpenCore to rename all
An entry for _DSM->XDSM would be:
Comment: Change all _DSM to XDSM
Find: <5f44534d>
Replace: <5844534d>
Renaming all _DSM to XDSM ensures no existing _DSM at the NVMe SSD path. The _DSM injection via SSDT-NVME-DISABLE.aml will not work if there is an existing _DSM at that particular path.
NOTE: If you already have a statically patched DSDT.aml in ACPI/patched (Clover) or ACPI (OpenCore), you should not use the _DSM->XDSM patch. Instead, make sure you removed the _DSM at the path (or renamed it to XDSM) in your patched DSDT (or patched SSDTs) at ACPI/patched (Clover) or ACPI (OpenCore). Typically, this would be done by applying "Remove _DSM methods", or "Rename _DSM methods to XDSM" as per the laptop ACPI patching guide.
This guide covers disabling unsupported NVMe Drives on macOS and is supported by both, i.e. Clover and OpenCore bootloaders. By following this guide, you'll be able to disable the unsupported NVMe Drive for booting macOS.
Overview
With a few NVMe Drives, some users may experience a Kernel Panic when booting the macOS installer, before reaching the installation stage. Although there could be several underlying causes for a Kernel Panic, this panic is related to NVMe Drive used in the target system. This can also be seen using the verbose mode:
Code:
panic(cpu 3 caller 0xffffff801a4d1830): nvme: "Fatal error occurred. CSTS=0x1 US[1]=0x0 US[0]=0x0 VID=0x1c5c DID=0x174a
. FW Revision not available\n"@/System/Volumes/Data/SWE/macOS/BuildRoots/90c5b03f75/Library/Caches/com.apple.xbs/Sources/IONVMeFamily/IONVMeFamily-557.120.1/Common/IONVMeController.cpp:5505
Backtrace (CPU 3), Frame : Return Address
0xffffffa086543970 : 0xffffff8017c8822d
0xffffffa0865439c0 : 0xffffff8017dd0be3
0xffffffa086543a00 : 0xffffff8017dc11da
0xffffffa086543a50 : 0xffffff8017c2ca2f
0xffffffa086543a70 : 0xffffff8017c87a4d
0xffffffa086543b90 : 0xffffff8017c87d43
0xffffffa086543c00 : 0xffffff801849bcea
0xffffffa086543c70 : 0xffffff801a4d1830
0xffffffa086543c80 : 0xffffff801a4b6440
0xffffffa086543de0 : 0xffffff80183f28d5
0xffffffa086543e50 : 0xffffff80183f27d6
0xffffffa086543e80 : 0xffffff8017cce945
0xffffffa086543ef0 : 0xffffff8017ccf8b4
0xffffffa086543fa0 : 0xffffff8017c2c13e
      Kernel Extensions in backtrace:
         com.apple.iokit.IONVMeFamily(2.1)[035AE587-5F55-3282-A65A-1114788DE549]@0xffffff801a4af000->0xffffff801a4d8fff
            dependency: com.apple.driver.AppleEFINVRAM(2.1)[BD954864-E253-3BE1-A7F4-DD2E3FA39BB5]@0xffffff80190fe000->0xffffff8019107fff
            dependency: com.apple.driver.AppleMobileFileIntegrity(1.0.5)[48C56DA7-637E-338A-BF89-6384B57A39CB]@0xffffff80192c0000->0xffffff80192d5fff
            dependency: com.apple.iokit.IOPCIFamily(2.9)[8A3EC495-5051-3382-A453-AF22730D6FD6]@0xffffff801a76d000->0xffffff801a795fff
            dependency: com.apple.iokit.IOReportFamily(47)[979BFD79-FE2F-3D67-93AF-9CFEBDFD9250]@0xffffff801a7a4000->0xffffff801a7a6fff
            dependency: com.apple.iokit.IOStorageFamily(2.1)[A3025F6C-469F-3538-8476-58A30B6AC747]@0xffffff801a870000->0xffffff801a881fff

Process name corresponding to current thread: kernel_task
Boot args: -v npci=0x3000 chunklist-security-epoch=0 -chunklist-no-rev2-dev

Mac OS version:
20G1120

Kernel version:
Darwin Kernel Version 20.6.0: Fri Dec 16 00:35:00 PST 2022; root:xnu-7195.141.49~1/RELEASE_X86_64
Kernel UUID: 5C6437D0-3E72-3CE6-A06A-A14A999AF7ED
KernelCache slide: 0x0000000017a00000
KernelCache base:  0xffffff8017c00000
Kernel slide:      0x0000000017a10000
Kernel text base:  0xffffff8017c10000
__HIB  text base: 0xffffff8017b00000
System model name: iMacPro1,1 (Mac-7BA5B2D9E42DDD94)
System shutdown begun: NO
Panic diags file available: NO (0xe00002bc)
Hibernation exit count: 0

System uptime in nanoseconds: 76769844378
Last Sleep:           absolute           base_tsc          base_nano
  Uptime  : 0x00000011e04b21dc
  Sleep   : 0x0000000000000000 0x0000000000000000 0x0000000000000000
  Wake    : 0x0000000000000000 0x0000000ba19eb592 0x0000000000000000
With the introduction of macOS Sierra, it is possible to use NVMe Drives for macOS. However, additional patches are required due to specific models being supported in Sierra. With these patches, you can utilize any NVMe Drive under Sierra. Interestingly, with the release of macOS High Sierra, there is native support of NVMe Drives for macOS and the NVMe works out of the box without any tweak or specific configuration and there is no longer a need for these patches to utilize an NVMe drive. This means, most of the aftermarket NVMe drives can be used on macOS.
However, with the introduction of NVMe Drives, a few of the NVMe Controllers are not compatible with any macOS/OS X version and do not work out of the box despite having native support for NVMe. These SSDs are known to cause random Kernel Panics and it is not even possible to boot the macOS/OS X installer on a few certain SSDs (such as PC711, and BC711, PC601, P31 from SK Hynix) when installed in the target system. The system throws an immediate Kernel Panic before you can reach the macOS/OS X installer. In addition, performing a clean installation of macOS on these SSDs is also not possible. This situation is not only limited to Samsung, but includes other OEM brands such as SKHynix, Liteon, and PLEXTOR. Due to such an issue, it is very disappointing when it comes to Laptop and OEM users as they're enforced to either use an external drive or replace the existing drive with a recommended drive at an additional cost to have peace of mind. However, going with the drive replacement comes at the cost of additional effort of assembly and disassembly of the target system, which can be sometimes difficult for Laptop users, especially if you're a newbie.
Moreover, if you try to install macOS on a different target drive (such as an external drive), the macOS/OS X installer will still throw Kernel Panic, before reaching the installation stage. Therefore, you must disable these NVMe drives using one of the methods described in this guide.
The steps mentioned below are only valid if your system has a Kernel Panic relating to the NVMe and will not work if your system has a Kernel Panic due to some other cause. Please check the verbose log to ensure you're in the right direction.
Requirements
Following are the requirements for patching APIC Table on macOS. Please ensure you meet the requirements before proceeding with this guide.
| CPU |
|
| Bootloader |
|
| Kexts |
|
| Tools |
|
Assumptions
This guide assumes that you have already some experience with the following. Having some of the following experience can be really helpful when following the guide.
- Existing Windows Install
- macOS/OS X Bootable USB with a properly configured EFI
- Basic config.plist editing skills
- Basic MaciASL usage
- Basic Clover/OpenCore knowledge
- Basic knowledge of installing/injecting kexts
Available Methods for Disabling Unsupported NVMe Drives
There are essentially three methods you might employ to avoid this:
- disable the card in BIOS (but not all laptop BIOS implementations provide such an option)
- disable the card in in ACPI as per this guide: https://www.tonymacx86.com/threads/guide-disabling-discrete-graphics-in-dual-gpu-laptops.163772/
OR
- inject a few properties on the graphics device that prevent the base VESA drivers from loading
It is the third/last method mentioned that this guide will cover.
There are essentially three methods available for disabling the Unsupported NVMe Drives for macOS on your target system.
This guide will cover all the three methods as mentioned above and you can choose one of the method as per your choice.
All three methods have been described below. You can choose one of the methods based on your preference to disable the unsupported NVMe Drive(s) on macOS.
Method #1: Using Boot Args
Using Boot Args, you can disable the Unsupported NVMe. This method is a lot easier and more friendly for newbie users. However, with this method, all internal NVMe will be disabled completely except for the external one. To disable the Unsupported NVMe using the Boot Arg Method, follow the steps below.
1. Mount your ESP
2. Depending on your bootloader,
For Clover
1. Open your config.plist using any XML editor from
EFI/Clover directory2. Add
nvme=-1 under Arguments in the Boot section of your config.plist.3. Save
config.plist.For OpenCore
1. Open your config.plist using any XML editor from the
EFI/OC directory.2. Add
nvme=-1 in boot-args key under the 7C436110-AB2A-4BBB-A880-FE41995C9F82 UUID list in the NVRAM section of your config.plist.3. Save
config.plist.3. Restart your system for the applied changes to take effect. It is recommended to reset NVRAM twice at least.
Method #2: Using Device Properties
Method #3: Using Hotpatch
Using the Hotpatch method, you can
STEP 1: Determining the ACPI path of your NVMe device(s)
In order to disable the NVMe Drive(s) on the target system using the Hotpatch method, you must first determine the ACPI path that describes where your SSD is located in the ACPI namespace. You can use Windows Device Manager, or advanced users can determine it from IOReg. Both methods are described below. This is the most important step and is the root and therefore the ACPI Path must be accurate in order for the guide to work. Without the correct ACPI path, the guide simply won't work.
Because this guide is intended to be used prior to installation, it will make use of Windows as most of the users have Windows already installed. To find the ACPI path, follow the steps below
1. Open Device Manager either using Windows Search or using This PC>Device Manager
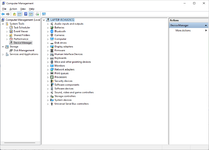
2. Expand
Storage Controllers under the Device Manager root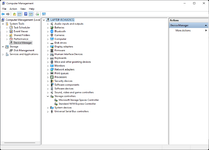
3. Select
Standard NVM Express Controller and then right-click and choose Properties.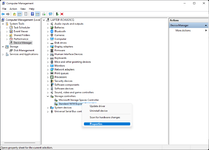
4. Under the Details Tab, find the
BIOS device name within the "Property" dropdown and select it. In some cases, the path may be under "Location paths". Your NVMe SSD ACPI path will be displayed in the "Value" box.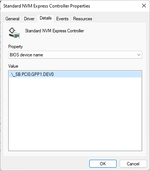
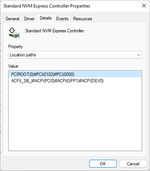
If you have more than one NVMe SSD in the target system, you must find the ACPI path for each one.
NOTE: It is also possible that your SSD has no ACPI identity. However, such a situation is probably rare on Intel-based systems, but common on AMD systems, but in that case, you may be able to determine only the ACPI identity of the parent (in the case of my NUC, the parent is _SB.PCI0.RP13), and slightly different SSDT would have to be created. If you don't see "BIOS device name", the SSD path is probably without one or more ACPI identities. In that case, look for "Location paths" and note down the path that starts with "ACPI(_SB_)". Be sure to read "Examples with incomplete ACPI identities" for additional information and instructions. See fixing missing ACPI device for more information.
STEP 2: Modifying the SSDT
Once you have obtained the ACPI path, you're ready to disable the NVMe by modifying the sample SSDT. Typically, the modification consists of changing the ACPI path only. The rest of the values in the SSDT does not need to be changed. To modify the SSDT, follow the steps below.
1. Based on Rehabman's class-code technique, download SSDT-NVME-DISABLE.aml.
2. Download the MaciASL of your choice.
3. Extract the MaciASL and move it to the Applications folder.
4. Open the downloaded
SSDT-NVME-DISABLE.aml using MaciASL.5. Now you need to change the ACPI Path in the SSDT to match yours. You can either manually replace these values or you can also use Find and Replace option in MaciASL using
Command+F or using the menu Edit>Find and Replace option.| To Replace | Original Value | Note |
|---|---|---|
| ACPI Path | PCXX.XXXX.XXXX | Depending on your ACPI path, change the ACPI Path with the value obtained in STEP #1. In our case, the ACPI path would be PCI0.GPP1.DEV0 |
Before changing:
After changing:
The path shown above
_SB.PCI0.GPP1.DEV0 is the path that our Laptop uses. You will notice the same path was shown in the above image from Windows Device Manager. You will need to replace both instances of it in the above SSDT to match the path for your own NVMe SSD.If your SSD had no ACPI identity (eg. no ACPI identity for the M.2 port/device), you would need to create one. For example, if the OEM had left out the PXSX identity, it would have been required that I add one:
I don't know what is displayed in Windows Device Manager in that case, although it is predictable what ioreg would look like. Of course, the idea here is to create the SSD before installing macOS, so let me know if you have a situation with no ACPI identity for the SSD.
And if you have multiple NVMe SSDs, you must create a _DSM method for each. For example, my NUC also has a M.2 port at RP09 for an SSD. Currently, I have an SM951/AHCI installed there, so it is not NVMe. But if it was an NVMe drive, my SSDT would have to modified to include a _DSM method for it as well:
6. Click on Compile and look for errors in the Compiler Summary. If there's an error, fix it and again click on Compile.
7. Save the changes to the SSDT using the
File>Save option.STEP 4: Installing the SSDT
Now you can install the
SSDT-NVME-DISABLE.aml file such that Clover or OpenCore can load it. If you're preparing your USB, you'll place it on the EFI of your Bootable USB, otherwise it will be on the EFI of your boot drive. Follow the steps below to install the SSDT.1. Mount your ESP.
2. Depending on your bootloader,
For Clover:
If you're using Clover, copy the
SSDT-NVME-DISABLE.aml and SSDT-DTGP.aml to EFI/Clover/ACPI/patched directory.For OpenCore:
If you're using OpenCore, copy
SSDT-NVME-DISABLE.aml and SSDT-DTGP.aml to EFI/OC/ACPI directory. You'll also need to add the ACPI entries in ACPI>Add section of your config.plist.3. Save your
config.plist.STEP 5: Restarting your System
After performing all the above steps, restart your system for the applied changes to take effect. It is recommended to reset NVRAM twice at least.
NOTE: If you're a Clover user and using SortedOrder in your
config.plist (not likely for a Clover setup for booting the installer), you will need to add SSDT-NVME-DISABLE.aml to it and you must ensure that SSDT-NVME-DISABLE.aml is in the SortedOrder list. When SortedOrder is specified, Clover only loads the SSDTs specified in it. SSDTs that are not in the SortedOrder list, are completely ignored by Clover and it will not load even though present in ACPI/patched directory. For most desktop and laptop scenarios where Clover ACPI hot-patching is being used, SortedOrder does not be specified, and copying the file to ACPI/patched is sufficient to load the SSDTs.Verifying the Spoof
The next step is to verify whether the NVMe is disabled or not. Follow the steps below to verify the .
Hackintool
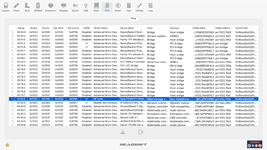
- Verify the target NVMe has Vendor ID, Device ID, Sub Vendor ID and Sub Device ID as 0xFFFF.
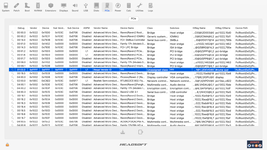
When using the Boot Arg method, you'll see something like the following:
Disk Utility
- Verify the target NVMe doesn't appear in Disk Utility
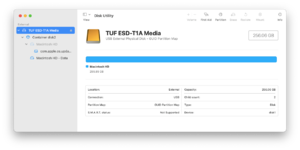
System Report
- Verify the target NVMe doesn't appear in NVMExpress.
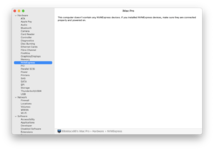
When using the Boot Arg method, you'll see something like the following:
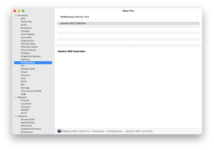
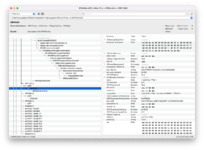
IOReg
- Verify the IONVMeController isn't loaded
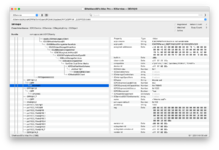
When using the Boot Arg method, you'll see something like the following:
Incomplete ACPI Identities
As mentioned in "Determining the ACPI path of your NVMe device(s)" above, your SSD path may be incomplete therefore without ACPI identities that lead all the way to the leaf node of the SSD. It is not possible to inject properties without a full ACPI path available (not even with config.plist/Devices/Arbitrary). In this case, we must complete the missing ACPI identity(s) for each node in the path including the leaf node that represents the SSD.
This is a simple example that shows an ACPI identity all the way to the parent of the SSD, but the SSD leaf node is without an ACPI identity:
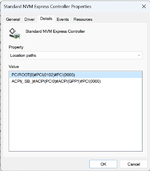
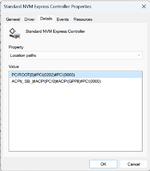
We can derive the path of the parent from ACPI(_SB_)#ACPI(PCI0)#ACPI(POP4) as _SB.PCI0.POP4, but the leaf node representing the SSD, #PCI(000), we will need to define ourselves as it doesn't exist in the OEM ACPI code.
And here is a bit more complex example of the SSD behind a PCI bridge. The PCI bridge, #PCI(0800), is without an ACPI identity as is the SSD, #PCI(000), itself:
The path to the parent of the PCI bridge can be derived from ACPI(_SB_)#ACPI(PCI0)#ACPI(PEG0)#ACPI(PEGP) as _SB.PCI0.PEG0.PEGP, but for the #PCI(0800)#PCI(0000), we must create the ACPI identity.
The result is as follows:
Existing _DSM Methods
This method uses a _DSM method in an SSDT to inject the properties and it is possible that your OEM already defined a
_DSM method at the ACPI path that defines your NVMe SSD in the ACPI namespace. If your native ACPI has an existing _DSM method at that path, you will need to rename it. This is because the native _DSM conflicts with the _DSM the SSDT-NVME-DISABLE.aml is adding and ACPI does not allow duplicate symbols at the same path, so if you have an existing _DSM, the _DSM we are trying to add via the SSDT-NVME-DISABLE.aml will be ignored.Although you can patch DSDT (or any OEM SSDT that may have the offending _DSM), it is a lot easier to use a patch in Clover or OpenCore to rename all
_DSM Methods to XDSM. Typically, this can be achieved by adding a _DSM to XDSM patch in your config.plist under ACPI>DSDT>Patches section (for Clover) and under ACPI>Patch (for OpenCore).An entry for _DSM->XDSM would be:
Comment: Change all _DSM to XDSM
Find: <5f44534d>
Replace: <5844534d>
Renaming all _DSM to XDSM ensures no existing _DSM at the NVMe SSD path. The _DSM injection via SSDT-NVME-DISABLE.aml will not work if there is an existing _DSM at that particular path.
NOTE: If you already have a statically patched DSDT.aml in ACPI/patched (Clover) or ACPI (OpenCore), you should not use the _DSM->XDSM patch. Instead, make sure you removed the _DSM at the path (or renamed it to XDSM) in your patched DSDT (or patched SSDTs) at ACPI/patched (Clover) or ACPI (OpenCore). Typically, this would be done by applying "Remove _DSM methods", or "Rename _DSM methods to XDSM" as per the laptop ACPI patching guide.
Last edited:

