• Become a Premium Member for $25/year with no ads to improve your community experience.

EliteMacx86

Administrator
Staff member
Joined
Jul 22, 2018
Messages
6,547
Motherboard
Supermicro X11SPA-T
CPU
Intel Xeon W-3275 28 Core
Graphics
2xAMD RX 580 8GB
OS X/macOS
13.x
Bootloader
  1. OpenCore (UEFI)
Mac
  1. Mac mini
  2. MacBook Pro
Mobile Phone
  1. Android
  2. iOS

How to Fix Administrator User Name and Password Requirement during macOS Ventura Clean Install​

An EliteMacx86 Exclusive Guide - This guide covers fixes Administrator User Name and Password requirement during macOS Ventura Beta 2 Clean install.

Overview

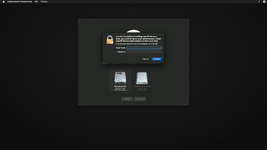
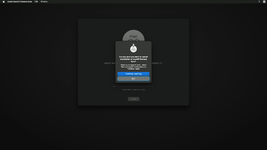
Apple announced their new macOS lineup i.e macOS Ventura 13.0 which is Apple's newest and most awaited OS. With the release of the first Beta (22A5266r). On the 22nd of June, Apple seeded Beta 2 (22A5286j) for developers. If you have ever attempted to clean install macOS Ventura Beta 2, you might have come across the error "In order to Continue installing macOS Ventura beta, you need to log in as an administrator. Install macOS Ventura beta needs to unlock your disk." This dialogue box appears as soon as you select the target disk and click on Continue.
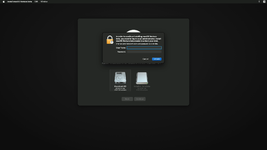
2022062503370553-min.png

Whether you have installed a new disk, or have formatted the entire disk using Disk Utility, before installing macOS Ventura Beta 2, it continues to ask for the administrator credentials. Please note that it does not accept any of your previous or current administrator credentials, including any iCloud credentials. This seems to be potentially a bug, unlike seen on Apple Silicon Macs, it does ask for credentials when erasing the disk. However, this is totally different in the macOS Ventura Beta 2 case. Luckily, there is a fix for it! Yes, you heard it right!

To fix the issue, follow the steps below.

Method #1: Using Terminal


Using Terminal, you can fix the issue, without the need for any existing macOS installed on the target Mac. To fix the issue using the Terminal method, follow the steps below.

1. Plug your macOS Ventura Bootable USB into your target Mac.
2. Restart your Mac and while restarting, hold down the option key and you'll see a couple of options for booting.
3. Select Install macOS Ventura beta and press enter to boot and the installer will load in a while.
4. When at the installation screen, select your preferred language and continue
5. Select Disk Utility and click on Continue

2022062503294840-min.png


6. Click on View and then select Show All Devices

2022062503301035-min.png


7. Now select your Hard Drive or SSD on which you want to install macOS and click on Erase button and use the following parameters to erase your drive.

Name: Macintosh HD
Format: APFS
Scheme: GUID Partition Map

2022062503354597-min.png


8. Once the parameter is set, click on Erase button and the disk will be erased.
9. After easing the disk, click on Done and close Disk Utility

2022062503360354-min.png


10. From Utilities select Terminal.
11. When in Terminal, type the following command
Code:
/Volumes/Image\ Volume/Install\ macOS\ Ventura\ beta.app/Contents/Resources/startosinstall --volume /Volumes/Macintosh\ HD/
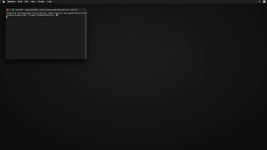
and press enter key.

2022062607054201-min.png

12. Now, type A or a to accept the license terms and then press enter key and it will start the installation.
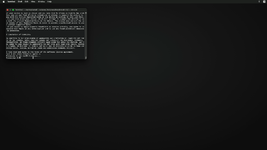
2022062607062013-min.png

Once the first phase of installation is completed, your Mac will restart like below
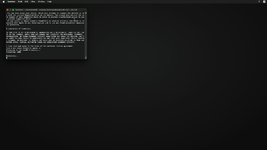
2022062607235805-min.png

Now your Mac will continue the installation.

Method #2: Using an existing macOS


This method is a bit lengthy and also requires a copy of macOS installed. To fix the issue using the existing macOS method, follow the steps below.

1. Login into your target Mac.
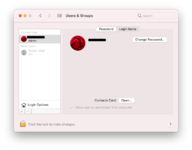
2. Open System Preferences. Click on Users & Groups.
3. In the left pane, you'll see a list of Current User
Screen Shot 2022-06-26 at 4.02.32 PM-min.png
4. Note down the username which will be used in the next step.
5. Start/Restart your Mac and while starting/restarting, hold down the option key and you'll see a couple of options for booting.
6. Select Install macOS Ventura beta and press enter to boot and the installer will load in a while.
7. When at the installation screen, select your preferred language and continue
8. Select Install macOS Ventura beta and click on Continue and then continue with the options.

2022062503361636-min.png


2022062503362509-min.png


2022062503364758-min.png


2022062503365246-min.png


9. Now select Macintosh HD and click on Continue and the installer will prompt to enter the administrator credentials.
2022062503370553-min.png

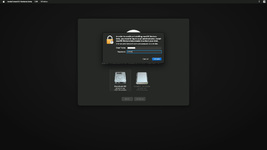
10. Enter the username that you obtained in STEP #1 and also enter your related password and click on Unlock.
2022062503372241-min.png

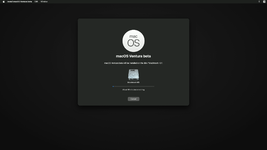
Once the Disk is unlocked, it will continue installing macOS Ventura Beta 2.
2022062600030052-min.png

11. Once the macOS starts installing, click on Cancel to interrupt the installation.
12. When prompted, click on Quit.
2022062600030803-min.png

13. Select Disk Utility and click on Continue

2022062503294840-min.png


14. Click on View and then select Show All Devices

2022062503301035-min.png


15. Now select your Hard Drive or SSD on which you want to install macOS and click on Erase button and use the following parameters to erase your drive.

Name: Macintosh HD
Format: APFS
Scheme: GUID Partition Map

2022062503354597-min.png


16. Once the parameter is set, click on Erase button and the disk will be erased.
17. After easing the disk, click on Done and close Disk Utility

2022062503360354-min.png


18. Select Install macOS Ventura beta and click on Continue and then continue with the options.

2022062503361636-min.png


2022062503362509-min.png


2022062503364758-min.png


2022062503365246-min.png


19. Now select Macintosh HD and click on Continue and the installer will prompt to enter the administrator credentials.

2022062503370553-min.png

20. Enter the username that you obtained in STEP #1 and also enter your related password and click on Unlock.

2022062503372241-min.png

Once the Disk is unlocked, it will continue installing macOS Ventura Beta 2.

2022062600030052-min.png

NOTE:
  • If you're having no macOS on your Mac, or you have installed a new disk, you need to install a copy of a compatible macOS version onto your Mac.

UPDATE:
This issue has been fixed in macOS Ventura Beta 3 [22A5295i]
 
Last edited:
  • Like
Reactions: tute123456
Method 2 is kinda confusing, couldn't make it work. Thanks for adding method 1.
Yes, Method 2 is a bit lengthy. Method 1 is quick and it works!
 
thanks for the work but i have an issu
it say "target could not be found"
btw i instal in partition not all volume
is there a solution thanks
 
thanks for the work but i have an issu
it say "target could not be found"
btw i instal in partition not all volume
is there a solution thanks
Then you need to adjust the command. Simply replace Macintosh HD with the name of your Volume.
 
sorry for my stupid question and thanks for the reply
now i have new issu
i can't see the battery in menu barre and i can't see pourcentage of consomation is there a solution?
 
sorry for my stupid question and thanks for the reply
now i have new issu
i can't see the battery in menu barre and i can't see pourcentage of consomation is there a solution?
Yes, there is.

 
merci pour le travail mais j'ai un problème
il me dit "cible introuvable"
btw j'installe dans la partition pas tout le volume
y a t'il une solution merci

How to Fix Administrator User Name and Password Requirement during macOS Ventura Clean Install​

An EliteMacx86 Exclusive Guide - This guide covers fixes Administrator User Name and Password requirement during macOS Ventura Beta 2 Clean install.

Overview

Apple announced their new macOS lineup i.e macOS Ventura 13.0 which is Apple's newest and most awaited OS. With the release of the first Beta (22A5266r). On the 22nd of June, Apple seeded Beta 2 (22A5286j) for developers. If you have ever attempted to clean install macOS Ventura Beta 2, you might have come across the error "In order to Continue installing macOS Ventura beta, you need to log in as an administrator. Install macOS Ventura beta needs to unlock your disk." This dialogue box appears as soon as you select the target disk and click on Continue.

View attachment 4514

Whether you have installed a new disk, or have formatted the entire disk using Disk Utility, before installing macOS Ventura Beta 2, it continues to ask for the administrator credentials. Please note that it does not accept any of your previous or current administrator credentials, including any iCloud credentials. This seems to be potentially a bug, unlike seen on Apple Silicon Macs, it does ask for credentials when erasing the disk. However, this is totally different in the macOS Ventura Beta 2 case. Luckily, there is a fix for it! Yes, you heard it right!

To fix the issue, follow the steps below.

Method #1: Using Terminal


Using Terminal, you can fix the issue, without the need for any existing macOS installed on the target Mac. To fix the issue using the Terminal method, follow the steps below.

1. Plug your macOS Ventura Bootable USB into your target Mac.
2. Restart your Mac and while restarting, hold down the option key and you'll see a couple of options for booting.
3. Select Install macOS Ventura beta and press enter to boot and the installer will load in a while.
4. When at the installation screen, select your preferred language and continue
5. Select Disk Utility and click on Continue

2022062503294840-min.png


6. Click on View and then select Show All Devices

2022062503301035-min.png


7. Now select your Hard Drive or SSD on which you want to install macOS and click on Erase button and use the following parameters to erase your drive.

Name: Macintosh HD
Format: APFS
Schéma : Carte de partition GUID

2022062503354597-min.png


8. Une fois le paramètre défini, cliquez sur le bouton Effacer et le disque sera effacé.
9. Après avoir soulagé le disque, cliquez sur Terminé et fermez Utilitaire de disque

2022062503360354-min.png


10. Dans Utilitaires, sélectionnez Terminal.
11. Dans Terminal, tapez la commande suivante
Code:
/Volumes/Image\ Volume/Install\ macOS\ Ventura\ beta.app/Contents/Resources/startosinstall --volume /Volumes/Macintosh\ HD/
et appuyez sur la touche Entrée.

View attachment 4542

12. Maintenant, tapez A ou a pour accepter les termes de la licence, puis appuyez sur la touche Entrée et l'installation démarrera.

View attachment 4543

Une fois la première phase d'installation terminée, votre Mac redémarrera comme ci-dessous

View attachment 4544

Maintenant, votre Mac va continuer l'installation.

Méthode #2 : Utiliser un macOS existant


Cette méthode est un peu longue et nécessite également une copie de macOS installée. Pour résoudre le problème à l'aide de la méthode macOS existante, suivez les étapes ci-dessous.

1. Connectez-vous à votre Mac cible.
2. Ouvrez les Préférences Système. Cliquez sur Utilisateurs et groupes.
3. Dans le volet de gauche, vous verrez une liste d'utilisateurs actuels

View attachment 4515
4. Notez le nom d'utilisateur qui sera utilisé à l'étape suivante.
5. Démarrez/redémarrez votre Mac et pendant le démarrage/redémarrage, maintenez la touche option enfoncée et vous verrez quelques options de démarrage.
6. Sélectionnez Installer macOS Ventura beta et appuyez sur Entrée pour démarrer et le programme d'installation se chargera dans un moment.
7. Lorsque vous êtes sur l'écran d'installation, sélectionnez votre langue préférée et continuez
8. Sélectionnez Installer la version bêta de macOS Ventura et cliquez sur Continuer, puis continuez avec les options.

2022062503361636-min.png


2022062503362509-min.png


2022062503364758-min.png


2022062503365246-min.png


9. Sélectionnez maintenant Macintosh HD et cliquez sur Continuer et le programme d'installation vous demandera d'entrer les informations d'identification de l'administrateur.

View attachment 4516

10. Entrez le nom d'utilisateur que vous avez obtenu à l'ÉTAPE #1 et entrez également votre mot de passe associé et cliquez sur Déverrouiller.

View attachment 4517

Une fois le disque déverrouillé, l'installation de macOS Ventura Beta 2 se poursuivra.

View attachment 4518

11. Une fois l'installation de macOS lancée, cliquez sur Annuler pour interrompre l'installation.
12. Lorsque vous y êtes invité, cliquez sur Quitter.

View attachment 4519

13. Sélectionnez Utilitaire de disque et cliquez sur Continuer

2022062503294840-min.png


14. Cliquez sur Afficher, puis sélectionnez Afficher tous les appareils

2022062503301035-min.png


15. Sélectionnez maintenant votre disque dur ou SSD sur lequel vous souhaitez installer macOS et cliquez sur le bouton Effacer et utilisez les paramètres suivants pour effacer votre disque.

Nom : Macintosh HD
Format : APSF
Schéma : Carte de partition GUID

2022062503354597-min.png


16. Une fois le paramètre défini, cliquez sur le bouton Effacer et le disque sera effacé.
17. Après avoir soulagé le disque, cliquez sur Terminé et fermez Utilitaire de disque

2022062503360354-min.png


18. Sélectionnez Installer macOS Ventura beta et cliquez sur Continuer puis continuez avec les options.

2022062503361636-min.png


2022062503362509-min.png


2022062503364758-min.png


2022062503365246-min.png


19. Sélectionnez maintenant Macintosh HD et cliquez sur Continuer et le programme d'installation vous demandera d'entrer les informations d'identification de l'administrateur.

View attachment 4516

20. Entrez le nom d'utilisateur que vous avez obtenu à l'ÉTAPE #1 et entrez également votre mot de passe associé et cliquez sur Déverrouiller.

View attachment 4517

Une fois le disque déverrouillé, l'installation de macOS Ventura Beta 2 se poursuivra.

View attachment 4518

REMARQUE:
  • Si vous n'avez pas de macOS sur votre Mac ou si vous avez installé un nouveau disque, vous devez installer une copie d'une version compatible de macOS sur votre Ma
 
English only!
 
Aucune des réponses n'a fonctionné pour la seconde solution j'ai un air mac book mais trop vieux pour Ventura et le terminal ne trouve pas ma cible USB et mon flash SSD je tape mon admin et mon mot de passe 100 fois rien n'y fait comme c'est fait ?? c'est un apple bug je n'ai eu aucun problème de ce genre avec Monterey désolé pour mon anglais médiocre
 

Forum statistics

Threads
1,448
Messages
13,765
Members
20,574
Latest member
eeeee