- Joined
- Jul 22, 2018
- Messages
- 8,361
- Motherboard
- Supermicro X11SPA-T
- CPU
- Intel Xeon W-3275 28 Core
- Graphics
- 2xAMD RX 580 8GB
- OS X/macOS
- 13.x
- Bootloader
- OpenCore (UEFI)
- Mac
- Mac mini
- MacBook Pro
- Mobile Phone
- Android
- iOS
How to Fix Internal Drives shown as External on macOS [Clover/OpenCore]
This guide describes how to fix internal drives shown as external on macOS. The guide works for both, Clover and OpenCore. By following this guide, you'll be able to fix the internal drives which are being shown as external drives.
Overview
On a few systems, typically with old AHCI Controllers, the internal drives are shown as external with yellow icon. This is more common with NVMe drives on AMD systems. However, no such issues with Intel systems for NVMe drives.
This is mainly caused due to the missing ACPI device due to extra PCI bridge in the NVMe path and due to the missing ACPI device, the
Moreover, this also tends to cause a certain amount of delay when booting macOS on such systems. The delay is more noticeable when you have the macOS installed on a traditional media.
You can check it using the IOReg
To fix the internal drives shown as external, follow the steps below.
Requirements
Following are the requirements for fixing the internal drive on macOS. Please ensure you meet the requirements before proceeding with this guide.
Available Methods
Following are the methods available for fixing the internal drives shown as external. All these methods have been described below.
Method #1: Using Kext
Using Innie, you can fix the issue by simply adding a kext to your existing configuration. To fix the internal drives shown as external using the Kext method, follow the steps below.
1. Download Innie
2. Mount your ESP.
3. Depending on your bootloader,
For Clover:
If you're using Clover, copy
For OpenCore:
If you're using OpenCore, copy
4. Restart your system for the applied changes to take effect. It is recommended to reset NVRAM twice at least.
Method #2: Using Device Properties
Using Device Properties, you can fix the issue without the need of any extra coding. To fix the internal drives shown as external using the Device Properties method, follow the steps below.
1. Get Device Path for the Internal Drives which are being shown as external.
2. Mount your ESP
3. Open your config.plist using any XML editor from the
4. Add the Device path which you obtained in step #1 of this guide under
5. Depending on the bootloader you use, add the following properties to your config.plist under Devices>Properties (for Clover) and DeviceProperties (for OpenCore) section.
7. Restart your system for the applied changes to take effect. It is recommended to reset NVRAM twice at least.
Now, you should be able to see your Disks as internal
Method #3: Using SSDT
This method is bit lengthy and also requires some ACPI knowledge. To fix the issue using SSDT method, follow the steps below
However, this is a more robust solution.
STEP 1: Finding ACPI Path of the Drives
The very first step is to find the ACPI path of the Internal Drives which are being shown as external. Without the correct path, the SSDT will never work.
STEP 2: Modifying the SSDT
Once you have the ACPI path of the internal drives, you're ready to modify the SSDT. To modify the SSDT, follow the steps below.
2. Download SSDT-NVME-FIX.aml
3. Download MaciASL of your choice.
4. Extract the MaciASL and move it to the Applications folder.
5. Open the SDT-NVME-FIX.aml using MaciASL.
6. Now you need to change the ACPI Path to match yours. You can either manually replace these values or you can also use Find and Replace option in MaciASL using Command+F or using the menu Edit>Find and Replace.
Depending on your ACPI path, change the following with the value obtained in the STEP #1. In our case, the ACPI path would be PCI0.GPP3.PT02.PT24
- PCXX.XXXX to PCI0.GPP3.PT02.PT24 in the line 23 and 25
Before changing:
After changing
Click on compile and look for errors in the Compiler Summary. If there's an error, fix it and again click on Compile.

Save the changes to the SSDT using File>Save option.

STEP 3: Installing the SSDT
The next step is to install the SSDT for fixing the internal drives shown as external drives. Follow the steps below to install the SSDT.
1. Mount your EFI partition
2. Depending on your bootloader,
For Clover:
If you're using Clover, copy the
For OpenCore:
If you're using OpenCore, copy
3. Save your config.plist
STEP 5: Restarting your System
After performing all the above steps, restart your system for the applied changes to take effect. It is recommended to reset NVRAM twice at least.
Now, you should be able to see your Disks as internal
Verifying the work
The next step is to verify whether the
1. Download IOReg and open it.
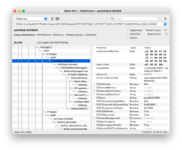
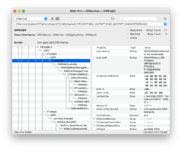
2. Ensure an ACPI device exists in the NVMe path.
Before patching:

After patching:

This guide describes how to fix internal drives shown as external on macOS. The guide works for both, Clover and OpenCore. By following this guide, you'll be able to fix the internal drives which are being shown as external drives.
Overview
On a few systems, typically with old AHCI Controllers, the internal drives are shown as external with yellow icon. This is more common with NVMe drives on AMD systems. However, no such issues with Intel systems for NVMe drives.
This is mainly caused due to the missing ACPI device due to extra PCI bridge in the NVMe path and due to the missing ACPI device, the
built-in status is also not present, which actually controls whether a connected storage media is internal or external. In addition, in most of the such cases, the device-id is also missing in IOReg. For systems with such a case, you must inject a compatible device-id to ensure the stability. Although, it's not mandatory, but is still highly recommend for the maximum stability.Moreover, this also tends to cause a certain amount of delay when booting macOS on such systems. The delay is more noticeable when you have the macOS installed on a traditional media.
You can check it using the IOReg
To fix the internal drives shown as external, follow the steps below.
Requirements
Following are the requirements for fixing the internal drive on macOS. Please ensure you meet the requirements before proceeding with this guide.
| Tools | Hackintool MaciASL |
Available Methods
Following are the methods available for fixing the internal drives shown as external. All these methods have been described below.
| Methods | Notes |
|---|---|
| Kext |
|
| Device Properties |
|
| ACPI Level |
|
Method #1: Using Kext
Using Innie, you can fix the issue by simply adding a kext to your existing configuration. To fix the internal drives shown as external using the Kext method, follow the steps below.
1. Download Innie
2. Mount your ESP.
3. Depending on your bootloader,
For Clover:
If you're using Clover, copy
Innie.kext to EFI/Clover/Kext/Others directory.For OpenCore:
If you're using OpenCore, copy
Innie.kext to EFI/OC/Kexts directory. You'll also need to add the kext entry in the Kernel section of your config.plist.4. Restart your system for the applied changes to take effect. It is recommended to reset NVRAM twice at least.
Method #2: Using Device Properties
Using Device Properties, you can fix the issue without the need of any extra coding. To fix the internal drives shown as external using the Device Properties method, follow the steps below.
1. Get Device Path for the Internal Drives which are being shown as external.
2. Mount your ESP
3. Open your config.plist using any XML editor from the
EFI/Clover (for Clover) and EFI/OC (for OpenCore) directory .4. Add the Device path which you obtained in step #1 of this guide under
Devices>Properties (for Clover) and DeviceProperties (for OpenCore) section.5. Depending on the bootloader you use, add the following properties to your config.plist under Devices>Properties (for Clover) and DeviceProperties (for OpenCore) section.
- Key* = built-in
- Value = 01000000
- Type = DATA
7. Restart your system for the applied changes to take effect. It is recommended to reset NVRAM twice at least.
Now, you should be able to see your Disks as internal
Method #3: Using SSDT
This method is bit lengthy and also requires some ACPI knowledge. To fix the issue using SSDT method, follow the steps below
However, this is a more robust solution.
STEP 1: Finding ACPI Path of the Drives
The very first step is to find the ACPI path of the Internal Drives which are being shown as external. Without the correct path, the SSDT will never work.
STEP 2: Modifying the SSDT
Once you have the ACPI path of the internal drives, you're ready to modify the SSDT. To modify the SSDT, follow the steps below.
2. Download SSDT-NVME-FIX.aml
3. Download MaciASL of your choice.
4. Extract the MaciASL and move it to the Applications folder.
5. Open the SDT-NVME-FIX.aml using MaciASL.
6. Now you need to change the ACPI Path to match yours. You can either manually replace these values or you can also use Find and Replace option in MaciASL using Command+F or using the menu Edit>Find and Replace.
Depending on your ACPI path, change the following with the value obtained in the STEP #1. In our case, the ACPI path would be PCI0.GPP3.PT02.PT24
- PCXX.XXXX to PCI0.GPP3.PT02.PT24 in the line 23 and 25
Before changing:
After changing
Click on compile and look for errors in the Compiler Summary. If there's an error, fix it and again click on Compile.
Save the changes to the SSDT using File>Save option.
STEP 3: Installing the SSDT
The next step is to install the SSDT for fixing the internal drives shown as external drives. Follow the steps below to install the SSDT.
1. Mount your EFI partition
2. Depending on your bootloader,
For Clover:
If you're using Clover, copy the
SSDT-NVME-FIX.aml to EFI/Clover/ACPI/patched directory.For OpenCore:
If you're using OpenCore, copy
SSDT-NVME-FIX.aml to EFI/OC/ACPI directory. You'll also need to add the ACPI entries in ACPI>Add section of your config.plist.3. Save your config.plist
STEP 5: Restarting your System
After performing all the above steps, restart your system for the applied changes to take effect. It is recommended to reset NVRAM twice at least.
Now, you should be able to see your Disks as internal
Verifying the work
The next step is to verify whether the
1. Download IOReg and open it.
2. Ensure an ACPI device exists in the NVMe path.
Before patching:

After patching:

Last edited:
