• Become a Premium Member for $25/year with no ads to improve your community experience.

How to Generate SSDT for CPU Power Management [Clover/OpenCore]

EliteMacx86

Administrator
Staff member
Joined
Jul 22, 2018
Messages
6,547
Motherboard
Supermicro X11SPA-T
CPU
Intel Xeon W-3275 28 Core
Graphics
2xAMD RX 580 8GB
OS X/macOS
13.x
Bootloader
  1. OpenCore (UEFI)
Mac
  1. Mac mini
  2. MacBook Pro
Mobile Phone
  1. Android
  2. iOS

How to Generate SSDT for CPU Power Management [Clover/OpenCore]

An EliteMacx86 Exclusive Guide - This guide covers implementation of SSDT for CPU Power Management using Clover and OpenCore.

Overview


Piker-Alpha has developed a script called ssdtPRGen which will generate a SSDT for your CPU. By implementing the CPU power management, you would be able to achieve the maximum amount of power states for your CPU. Please note that CPU power management is not mandatory. However, it's advised to enable it for best performance and efficiency.

Before you start, make sure you're having a working internet connection. This method is required by Ivy Bridge and older CPUs. For newer CPUs, refer to the guide linked below.

For Haswell and newer CPUs

For more information on Sandy Bridge-E and Ivy Bridge-E power management, refer to the guide linked below

Generating a SSDT for CPU Power Management


1. Before you generate a SSDT for your CPU, make sure that the correct SMBIOS has been configured for your current CPU.
2. Open Terminal and download the Piker Alpha's script.
Code:
curl -o ~/ssdtPRGen.sh https://raw.githubusercontent.com/Piker-Alpha/ssdtPRGen.sh/master/ssdtPRGen.sh

For newer CPUs, use beta branch.
Code:
curl -o ~/ssdtPRGen.sh https://raw.githubusercontent.com/Piker-Alpha/ssdtPRGen.sh/Beta/ssdtPRGen.sh

3. This will download the ssdtPRGen.sh script to your user directory. The next step is to change the file permission
Code:
chmod +x ~/ssdtPRGen.sh

4. For default SSDT generation, type:
Code:
sudo ~/ssdtPRGen.sh

5. Confirm y or n and it will generate the SSDT.
6. Open Finder and in menubar and click on Go to Folder
7. Type ~/Library/ssdtPRGen/


For Intel HEDT series CPUs


If you're using Intel HEDT CPU, the process is slightly changed. For reference, Intel Core i7-3820 has been used as an example.
Code:
./ssdtPRGen.sh -p 'i7-3820' -x 1 -target 0 -c 3 -cpus 1 -l 8 -mode custom -d 3

Where,

OptionsValueNotes
-pCPU model
  • CPU model
-x
  • 0
  • 1
  • Defines XCPM mode.
0
  • Disables XCPM mode.
1
  • Enables XCPM mode.
  • Adds PluginType=1.
-target
  • 0
  • 1
  • Defines CPU Target type
0
  • Sets CPU target as Sandy Bridge.
1
  • Sets CPU target as Ivy Bridge.
-c
  • 0
  • 1
  • 2
  • 3
  • Defines Compatibility Workarounds.
0
  • Sets no workarounds.
1
  • Injects extra (turbo) P-State at the top with maximum (turbo) frequency + 1 MHz.
2
  • Injects extra P-States at the bottom.
3
  • Includes option 1 and 2.
-cpusNumber of Physical CPU installed.
  • Sets number of physical processors.
  • The maximum number of supported CPU is upto 4 only.
-lNumber of Logical Processor
  • Number of CPU threads.
  • If you're using Dual CPU, double the threads count.
-mode
  • Normal
  • Custom
  • Defines script mode.
Normal
  • Use ACPI/IOREG data from the host computer.
Custom
  • Use ACPI data from: /Users/[username]/Desktop.
-d
0 = no debug injection/debug output
1 = inject debug statements in: ssdt_pr.dsl
2 = show debug output
3 = both
  • Defines XCPM mode.
0
  • No debug injection/debug output.
1
  • Injects debug statements in: ssdt_pr.dsl.
2
  • Show debug output.
3
  • Sets Option 1 and 2.

Installing SSDT


The next step is to install the SSDT to enable CPU Power Management.

Mount your ESP.

For Clover:
If you're using Clover, copy ssdt.aml to EFI/Clover/ACPI/patched

For OpenCore:
If you're using OpenCore, copy ssdt.aml to EFI/OC/ACPI. You'll also need to add the ssdt entry in ACPI>Add section of your config.plist

Notes :
  • The Power Management SSDT should always be named as SSDT.aml.
  • If you're already having a SSDT.aml in the directory, rename it to SSDT-1.aml, SSDT-2.aml and so on.
  • The default generated SSDT is ssdt.aml. You can rename it to SSDT.aml without any issue.

Restart your System


After performing all the above steps, restart your system for the applied changes to take effect.

Verifying CPU Power Management


The next step is to verify whether CPU Power Management is working or not.

Download IOReg and open it.

For Ivy Bridge:

1. Verify "plugin-type" property. The plugin-type property is located under the CPU node.
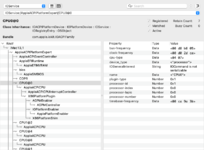

Screenshot 2020-12-22 at 11.09.14 PM.png

2. Verify "Machine" property. The Machine property is located under AGPMController which is under CPU0 node.
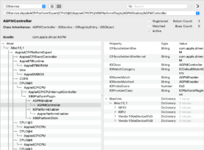
Screenshot 2020-12-22 at 11.13.39 PM.png


For Sandy Bridge:

1. Verify "AICPMVers" property. The AICPMVers property is located under ACPI_SMC_PlatformPlugin which is under CPU0 node.
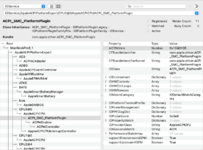
Screenshot 2020-12-22 at 6.53.05 PM.png

2. Verify "Machine" property. The Machine property is located under AGPMController which is under CPU0 node.
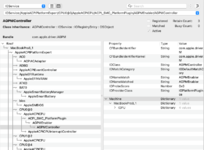
Screenshot 2020-12-22 at 6.59.55 PM.png

Testing Power Management


After restarting, you can test the power management. To test the power management, you need to use AppleIntelInfo.kext. You can either compile AppleIntelInfo.kext using XCode or can download from the post in the attachment.

1. Download and extract AppleIntelInfo.kext to your Desktop
2. Open Terminal

3. Type:
Code:
sudo kextutil /Users/yourusername/Desktop/AppleIntelInfo.kext
When promoted, enter your password.

Note:
If you get an error while loading kext, follow the steps below.


Code:
sudo chown -R root:wheel ~/Desktop/AppleIntelInfo.kext
Code:
sudo chmod -R 755 ~/Desktop/AppleIntelInfo.kext

Continue from the step 3.
4. Type:

Code:
sudo cat /tmp/AppleIntelInfo.dat
When promoted, enter your password.

5. The power states will be shown in the Terminal.
6. Now, do some benchmark to stress the system.
7. Recheck the power states.

Using Intel Power Gadget Tool
Install Intel Power Gadget.
Leave the system idle for a minute.
After a minute or two, start doing tasks on your system. You can use a benchmarking software to increase the CPU load.

Credits :
Pike R. Alpha
RehabMan
 

Attachments

  • AppleIntelInfo.kext.zip
    46.9 KB · Views: 1,917
  • Screenshot 2020-12-22 at 11.08.06 PM.png
    Screenshot 2020-12-22 at 11.08.06 PM.png
    123.1 KB · Views: 434
Last edited:
Hello guys, i have some error Screenshot 2018-11-19 at 20.52.28.png
 
Hello guys, i have some errorView attachment 1423
As per your profile, you should follow the Laptop Power Management guide. You do not need to generate a SSDT for your Laptop. It's not needed. Your profile needs to be fixed. Intel Core i7-8550U has Intel UHD Graphics 620 not HD 620.
Provide PR files.
 
Thanks for the guide ,need to copy only SSDT.aml to Patched folder or all SSDT-1,SSDT-2,SSDT-3,SSDT-4 aml patches


CPU Ratio Info:
------------------------------------
CPU Low Frequency Mode.............: 1600 MHz
CPU Maximum non-Turbo Frequency....: 3400 MHz
CPU Maximum Turbo Frequency........: 3900 MHz

IGPU Info:
------------------------------------
IGPU Current Frequency.............: 350 MHz
IGPU Minimum Frequency.............: 350 MHz
IGPU Maximum Non-Turbo Frequency...: 650 MHz
IGPU Maximum Turbo Frequency.......: 1150 MHz
IGPU Maximum limit.................: No Limit

CPU P-States [ (16) 29 37 ] iGPU P-States [ (7) ]
CPU P-States [ (16) 29 32 37 ] iGPU P-States [ (7) ]
CPU P-States [ (16) 29 32 34 37 ] iGPU P-States [ (7) ]
CPU P-States [ (16) 29 32 33 34 37 ] iGPU P-States [ (7) ]
CPU P-States [ (16) 24 29 32 33 34 37 ] iGPU P-States [ (7) ]
CPU P-States [ (16) 24 29 31 32 33 34 37 ] iGPU P-States [ (7) ]
CPU P-States [ (16) 22 24 29 31 32 33 34 37 ] iGPU P-States [ (7) ]
CPU P-States [ (16) 22 24 29 30 31 32 33 34 37 ] iGPU P-States [ (7) ]
CPU P-States [ (16) 22 24 28 29 30 31 32 33 34 37 ] iGPU P-States [ (7) ]
CPU P-States [ (16) 22 24 28 29 30 31 32 33 34 35 37 ] iGPU P-States [ (7) ]
 

Attachments

  • ssdPRGen.jpg
    ssdPRGen.jpg
    23.9 KB · Views: 942
  • AppleIntelInfo.txt
    20.8 KB · Views: 667
I've been trying to overclock my Hackintosh, but I keep running into a problem. My Hackintosh runs at 3.0 Ghz (i9 10980XE), however, when I overclock in BIOS, even to just 3.1 Ghz, the Mac will not boot. I know it is something I am missing, because windows boots fine and is stable with the overclock up to 4.1 Ghz. Is there an entry in config.plist which I'm missing? Do I truly need this SSDT to work in tandem with the already set BIOS settings for Mac OS to boot (on an overclock?) Mac already boots great without overclock, only thing not working is thunderbolt 3 HotPlug even though I followed your guide :/

The computer hangs right at boot, at the
[EB|'B:WFDW] Err(0xE), 0 @ LocHB 71B4903C-14EC-42C4-BDC6-CE1449930E49

strangely, this text all appears without the overclock applied as well, it just goes away quickly. Applied the attached energy management DDST with no effect.

System Specs:
Asus X299 Deluxe II
Arctic 208 Water Cooled CPU
i9-10980XE 18/36
Radeon RX 5700 XT
1000W 80+ Gold Phanteks PSU
OS X 10.15.7

I don't want to waste your time with too much back and forth. Is there a way to do a quick Skype/facetime or something similar? I would pay you for your time, it would be faster for both of us, and I'd write out the solution here once we are done, to help others, if you choose that. I also have a problem with TB3 HotPlug, unfortunately in all 14 pages of the HotPlug thread guide none of the answers resolved the integrated thunderbolt question with the Asus x299 Deluxe II. Thank you for your work.
 

Attachments

  • Config.plist.zip
    4.5 KB · Views: 436
  • ACPI, Driver, Kexts.zip
    1.9 MB · Views: 430
  • 10980XEssdt.aml.zip
    1.6 KB · Views: 390
  • 73BCCE6C-2ABC-4AF8-B1BA-0ECC88B827B4.jpeg
    73BCCE6C-2ABC-4AF8-B1BA-0ECC88B827B4.jpeg
    786.7 KB · Views: 373
Last edited:
I've been trying to overclock my Hackintosh, but I keep running into a problem. My Hackintosh runs at 3.0 Ghz (i9 10980XE), however, when I overclock in BIOS, even to just 3.1 Ghz, the Mac will not boot. I know it is something I am missing, because windows boots fine and is stable with the overclock up to 4.1 Ghz. Is there an entry in config.plist which I'm missing? Do I truly need this SSDT to work in tandem with the already set BIOS settings for Mac OS to boot (on an overclock?) Mac already boots great without overclock, only thing not working is thunderbolt 3 HotPlug even though I followed your guide :/

The computer hangs right at boot, at the
[EB|'B:WFDW] Err(0xE), 0 @ LocHB 71B4903C-14EC-42C4-BDC6-CE1449930E49

strangely, this text all appears without the overclock applied as well, it just goes away quickly. Applied the attached energy management DDST with no effect.

System Specs:
Asus X299 Deluxe II
Arctic 208 Water Cooled CPU
i9-10980XE 18/36
Radeon RX 5700 XT
1000W 80+ Gold Phanteks PSU
OS X 10.15.7

I don't want to waste your time with too much back and forth. Is there a way to do a quick Skype/facetime or something similar? I would pay you for your time, it would be faster for both of us, and I'd write out the solution here once we are done, to help others, if you choose that. I also have a problem with TB3 HotPlug, unfortunately in all 14 pages of the HotPlug thread guide none of the answers resolved the integrated thunderbolt question with the Asus x299 Deluxe II. Thank you for your work.
The configuration is not as per the guide.
 
Thanks for the guide ,need to copy only SSDT.aml to Patched folder or all SSDT-1,SSDT-2,SSDT-3,SSDT-4 aml patches


CPU Ratio Info:
------------------------------------
CPU Low Frequency Mode.............: 1600 MHz
CPU Maximum non-Turbo Frequency....: 3400 MHz
CPU Maximum Turbo Frequency........: 3900 MHz

IGPU Info:
------------------------------------
IGPU Current Frequency.............: 350 MHz
IGPU Minimum Frequency.............: 350 MHz
IGPU Maximum Non-Turbo Frequency...: 650 MHz
IGPU Maximum Turbo Frequency.......: 1150 MHz
IGPU Maximum limit.................: No Limit

CPU P-States [ (16) 29 37 ] iGPU P-States [ (7) ]
CPU P-States [ (16) 29 32 37 ] iGPU P-States [ (7) ]
CPU P-States [ (16) 29 32 34 37 ] iGPU P-States [ (7) ]
CPU P-States [ (16) 29 32 33 34 37 ] iGPU P-States [ (7) ]
CPU P-States [ (16) 24 29 32 33 34 37 ] iGPU P-States [ (7) ]
CPU P-States [ (16) 24 29 31 32 33 34 37 ] iGPU P-States [ (7) ]
CPU P-States [ (16) 22 24 29 31 32 33 34 37 ] iGPU P-States [ (7) ]
CPU P-States [ (16) 22 24 29 30 31 32 33 34 37 ] iGPU P-States [ (7) ]
CPU P-States [ (16) 22 24 28 29 30 31 32 33 34 37 ] iGPU P-States [ (7) ]
CPU P-States [ (16) 22 24 28 29 30 31 32 33 34 35 37 ] iGPU P-States [ (7) ]
There should be more P-States. Check your work.
 

Forum statistics

Threads
1,447
Messages
13,764
Members
20,573
Latest member
luizhtss