How to Fix DMAR Table on macOS | Memory Mapping
Overview
On some systems, when you enable VT-d which is required for some major functioning of a few particular devices such as Antelope Audio Interface and other Thunderbolt capable Devices, the system starts acting weird and all of the sudden network devices no longer work including Ethernet and WiFi. When checking the Devices in System Preferences>Network, the network adapters are in a loop, infinite link-up and link-down but never connect.
From OpenCore Documentation (DisableioMapper section)
Misconfigured IOMMU in the firmware may result in broken devices such as ethernet or Wi-Fi adapters. For instance, an ethernet adapter may cycle in link-up link-down state infinitely and a Wi-Fi adapter may fail to discover networks. Gigabyte is one of the most common OEMs with these issues.
Such issues were seen on systems running Big Sur and Later. To overcome this issue, a user @yosoyoco came up with a fix and the idea was to fix the DMAR Table by removing the reserved memory regions from the original OEM DMAR Table, and then further dropping the OEM DMAR Table, and using the fixed DMAR Table.
This fix is required for the systems running Big Sur and Later. Although, few users have reported it on Catalina and prior too.
Since macOS Ventura, enabling VT-d is a must. VT-d is required for working Network Adapters, including built-in and PCIe based. This has been already discussed in the thread below.

README - Common Problems in macOS Ventura (13.0)
Common Problems in macOS Ventura (13.0) This thread is for common problems in macOS Ventura. The problems listed here are likely to be experienced by users who attempt to install macOS Ventura 13.0. This is not a troubleshooting thread. Please do not ask questions regarding your specific issue...
 elitemacx86.com
QUICK INFO:
- The DMAR Fix is required for systems that have enabled VT-d. Note that on some systems, enabling the VT-d function may not cause the network disruption as mentioned above. However, it is still recommended to implement the DMAR fix to avoid any potential issues.
Requirements
The requirements are pretty much the same as VT-d
STEP 1: Enable Apple VT-d
The very first step is to enable VT-d function in BIOS/UEFI as without that, it won't be possible to have the DMAR Table when extracting the native ACPI Tables. To enable VT-d, simply set VT-d to Enabled in your BIOS/UEFI. For more information on enabling Apple VT-d, read below

GUIDE - How to Enable Apple VTD on macOS [Clover/OpenCore]
How to Enable Apple VTD on macOS [Clover/OpenCore] An EliteMacx86 Exclusive Guide - This guide covers the implementation of the Apple VTD function on macOS for Desktops and Laptops. By following this guide, you'll be able to enable VT-d on macOS using Clover or OpenCore Bootloader. Overview...
 elitemacx86.com
STEP 2: Extracting Native ACPI Tables
The next step is to extract your native ACPI Tables for patching. We recommend it extracting using Clover, for the highest level of integrity. If you're not aware of how to do that, a guide is already available which is linked below.

GUIDE - How to Extract DSDT/SSDTs
How to Extract DSDT/SSDTs An EliteMacx86 Exclusive Guide - This guide covers the extraction of ACPI sets, (commonly known as DSDT and SSDTs) using Clover. Overview Extracting DSDT/SSDTs is very easy and has minimal requirements. To extract the DSDT/SSDT, follow the steps below. For Clover...
 elitemacx86.com
STEP 3: Fixing DMAR Table
1. Once you're done with the extraction, copy the origin folder to any working directory of your choice.
2. Open the copied origin folder
3. Locate and copy the
DMAR.aml file to your working directory.4. Download MaciASL.
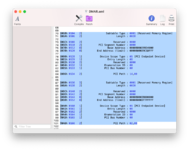
5. Open the DMAR.aml file using MaciASL. You should have a similar table as the screenshot attached below.

5. Find the Memory Regions and delete them. In our case, the Memory region starts from line 70 and ends at line 101.

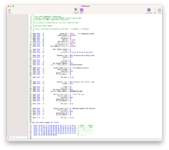
Upon deleting the Memory Regions, the DMAR Table should look similar to the screenshot attached below.

As you can see, it's very clear that now, the memory regions have been deleted. Which is the essence
6. Click on Compile button.
7. Go to File Menu and select Save As option. Make sure to select ACPI Machine Language Binary in the File Format selection.
STEP 4: Copy DMAR SSDT
The next step is to copy the newly patched DMAR Table. To copy the DMAR Table, follow the steps below.
1. Mount your ESP
2. If you're using OpenCore, copy the new
DMAR.aml SSDT from STEP #3 to EFI/OC/ACPI directory. If you're using Clover, copy the DMAR.aml SSDT from STEP #3 to EFI/Clover/ACPI/patched directory.STEP 5: Modify EFI Configuration
The next step is to add the required changes by editing your config.plist. The changes are supported by both bootloaders, i.e OpenCore and Clover. To modify, follow the steps below.
1. Mount your ESP
For OpenCore
1. Open your config.plist from
EFI/OC directory2. Navigate to the ACPI section and implement the following changes
ACPI
This section is for loading, blocking, and patching the ACPI tables. The sub-sections are explained below.
Add
This section is for adding the DSDT and SSDT files for your system. This basically includes USB and CPU Power Management SSDT.
The required settings include:
| Path* | Value | Notes |
|---|---|---|
| SSDT-DMAR | YES |
|
Delete
This section allows blocking the ACPI tables from loading.
The required settings include:
| Table Signature* | OemTableId | TableLength | Comment | All | Enabled | Notes |
|---|---|---|---|---|---|---|
| DMAR | 0 | Drop OEM DMAR Table | YES |
|
3. Save your config.plist.
For Clover
1. Open your config.plist from EFI/Clover directory
2. Navigate to the ACPI section and implement the following changes
ACPI
This section is for loading, blocking, and patching the ACPI tables. The sub-sections are explained below.
Drop Tables
This section allows blocking the ACPI tables from loading.
The required settings include:
| Signature* | Type/Key | String[Tabled]Number[Length] | DropForAllOS | Notes |
|---|---|---|---|---|
| DMAR | NO |
|
SSDT
This section is for adding the DSDT and SSDT files for your system when using a Sorted Order. If you're using Full patched DSDT+SSDT, set Drop OEM to true. When using this option, you also need to use Sorted Order. See the Sorted Order information below.
SortedOrder
This section is for adding the DSDT and SSDT files for your system when using a Sorted Order. If you're using a Sorted Order configuration, add SSDT-DMAR.aml to the list.
3. Save your config.plist.
STEP 6: Restart your System
After performing all the above steps, restart your system for the applied changes to take effect.
Last edited:

