• Become a Premium Member for $25/year with no ads to improve your community experience.

How to Enable Write Access on Root Volume on macOS Big Sur and Later

Mac added Signed System Volume (SSV) after Big Sur, you can disable it in recovery mode using follow command

csrutil authenticated-root disable

if SSV enabled, it will check file signature when boot system, and will refuse boot if you do any modify, also will cause create snapshot failed

this article describe it in detail

 
  • Like
Reactions: AllertCron
Mac added Signed System Volume (SSV) after Big Sur, you can disable it in recovery mode using follow command

csrutil authenticated-root disable

if SSV enabled, it will check file signature when boot system, and will refuse boot if you do any modify, also will cause create snapshot failed

this article describe it in detail

Will test it soon and will update the guide accordingly. However, the guide works perfect for Hacks ;)
 
Hi - since after my Corona quarantine I can't see the four walls of my home any longer I'm here @ work during those "inbetween days" and tried @reinstallsys's instructions.

Here are my results:

a) disabled authenticated-root with csrutil in recovery mode

b) re-booted the system

c) went through @EliteMacx86's walkthrough again (easy enough, since all the commands applied are stored in my terminal history).

d) still got this warning

com.apple.driver.KextExcludeList was not found!

e) snapshot creation by bless command this time finished without any error message

f) system boots up fine

☝️ STILL ☝️ the modifications I applied to the livemounted system partition had not been preserved (which were, as stated before, mode and order in which the content of root folder, system folder, library folder etc. are displayed).

Monterey still shows the content of the root folder in the order

[USERS] | [LIBRARY] | [APPLICATIONS] | [SYSTEM]

(I'd like to see them in that order: [SYSTEM] | [LIBRARY] | [APPLICATIONS] | [USERS] )

and with that darned side panel activated (which makes me feel like wanting to vomit every time I see it) and nothing I did with the live mounted root partition seems to be able to change anything about it.

😢
 
Last edited:
I also tried the same procedure with the "root" account (after activating it) – same result.


I also tried (formely) to give my personal account "read / write access" to the root partiton - resulting in the message: "You don't have required privileges to perform this task..."

Now I tried to grant my account read / write privileges from the root account (which should be privileged to do every f§$king thing it wants to a system) – same result...


Now do I really have to live with a system looking like those bastards from  want it to look like (and not the way I'm used to it now since MacOS 10.1)? o_O
 
com.apple.driver.KextExcludeList was not found!
This can be ignored.
☝️ STILL ☝️ the modifications I applied to the livemounted system partition had not been preserved (which were, as stated before, mode and order in which the content of root folder, system folder, library folder etc. are displayed).
What modifications did you apply exactly?
I also tried the same procedure with the "root" account (after activating it) – same result.


I also tried (formely) to give my personal account "read / write access" to the root partiton - resulting in the message: "You don't have required privileges to perform this task..."

Now I tried to grant my account read / write privileges from the root account (which should be privileged to do every f§$king thing it wants to a system) – same result...


Now do I really have to live with a system looking like those bastards from  want it to look like (and not the way I'm used to it now since MacOS 10.1)? o_O
I also took a reference from Bigsurmicropatcher and that also does the same thing and I have got it to work on a MacPro 5,1.
 
What modifications did you apply exactly?

I described them: I'm used to have my root folder displayed in a certain order (as well as the content of the system and the library folder) - like this:

Bildschirmfoto 2021-12-30 um 13.24.19.png

...and not in the shitty way that seems to be locked on the SSV root partition:

Bildschirmfoto 2021-12-30 um 13.25.59.png

Re-arranging the icons and the way they are displayed (and attaching a window background to the folder) worked fine on the livemount partion (whatever you try to do with the *original* SSV partition is ignored anyway) – but after saving the snapshot and re-booting the system, all the changes were reset to what Apple wants the root folder to look like. :(
 
Last edited:
I described them: I'm used to have my root folder displayed in a certain order (as well as the content of the system and the library folder) - like this:

View attachment 3930

...and not in the shitty way that seems to be locked on the SSV root partition:

View attachment 3932

Re-arranging the icons and the way they are displayed (and attaching a window background to the folder) worked fine on the livemount partion (whatever you try to do with the *original* SSV partition is ignored anyway) – but after saving the snapshot and re-booting the system, all the changes were reset to what Apple wants the root folder to look like. :(
I will be trying the new step posted by @reinstallsys this week. Just busy with several projects.
 
I tried this to modify two preexisting kexts in S/L/E. I made sure to disable authenticated-root and SIP (even had gatekeeper disabled). I was able to do the edits and rebuild the kernel cache, but upon restarting, I got stuck in a boot loop. I could enter macOS Recovery and power off, but was unable to get out of it without reinstalling macOS.

Before I did the reinstall, I noticed that there was two APFS system snapshots in Disk Utility from macOS Recovery. One was the standard system snapshot and the other was the blessed snapshot. Is it possible I didn't need to bless livemount because I only modified existing kernels, disabled authenticated-root, and/or on a genuine mac? If not, any other ideas on why I get stuck in a boot loop?

I attached a screenshot of
Bash:
diskutil list
to speedup the troubleshooting. Lastly, I did not experience any errors when running any of the terminal commands.
Some variants of the 6900 XT have a higher binned gpu called the Navi21 XTXH in contrast to the launch gpu, the Navi21 XTX. The only difference besides performance is the device-id: 73AF1002 for the XTXH versus 73BF1002 for the XTX. They even use the same drivers.

Apple added 6900 XT support in macOS 11.4, but failed to include the device-id for the XTXH gpu. In macOS 12.0.1, they added it to AMDRadeonX6000Framebuffer.kext/Contents/Info.plist, but have yet to add it to ~/Contents/Info.plist for AMDRadeonX6000.kext & AMDRadeonX6000HWServices.kext which is all that remains to bring support to macOS.

Previously, I attempted to use the Kryptonite bootloader (stripped down version of OpenCore for genuine macs with eGPUs) to do this modification in memory. Those with hackintoshes succeeded at doing this with OpenCore, but alas it didn't work for genuine macs even with the Kryptonite bootloader which is why I'm here now.
 

Attachments

  • Screen Shot 2022-01-14 at 4.18.25 PM.png
    Screen Shot 2022-01-14 at 4.18.25 PM.png
    439.8 KB · Views: 50
I tried this to modify two preexisting kexts in S/L/E. I made sure to disable authenticated-root and SIP (even had gatekeeper disabled). I was able to do the edits and rebuild the kernel cache, but upon restarting, I got stuck in a boot loop. I could enter macOS Recovery and power off, but was unable to get out of it without reinstalling macOS.

Before I did the reinstall, I noticed that there was two APFS system snapshots in Disk Utility from macOS Recovery. One was the standard system snapshot and the other was the blessed snapshot. Is it possible I didn't need to bless livemount because I only modified existing kernels, disabled authenticated-root, and/or on a genuine mac? If not, any other ideas on why I get stuck in a boot loop?

I attached a screenshot of
Bash:
diskutil list
to speedup the troubleshooting. Lastly, I did not experience any errors when running any of the terminal commands.
Some variants of the 6900 XT have a higher binned gpu called the Navi21 XTXH in contrast to the launch gpu, the Navi21 XTX. The only difference besides performance is the device-id: 73AF1002 for the XTXH versus 73BF1002 for the XTX. They even use the same drivers.

Apple added 6900 XT support in macOS 11.4, but failed to include the device-id for the XTXH gpu. In macOS 12.0.1, they added it to AMDRadeonX6000Framebuffer.kext/Contents/Info.plist, but have yet to add it to ~/Contents/Info.plist for AMDRadeonX6000.kext & AMDRadeonX6000HWServices.kext which is all that remains to bring support to macOS.

Previously, I attempted to use the Kryptonite bootloader (stripped down version of OpenCore for genuine macs with eGPUs) to do this modification in memory. Those with hackintoshes succeeded at doing this with OpenCore, but alas it didn't work for genuine macs even with the Kryptonite bootloader which is why I'm here now.
Yes, that's exactly what is happening as reported by other users too. I'll be taking a look at it soon.
 
How to Enable Write Access on Root Volume in macOS Big Sur

An EliteMacx86 Exclusive Guide - This guide covers mounting of system root volume on macOS Big Sur. By following this guide, you'll be able to have write access onto the system's root volume.

Overview


Recently, Apple announced their new macOS lineup i.e macOS Big Sur 11.0 which is Apple's newest and most awaited OS. Catalina adding massive updates and improvements from its predecessor, Mojave.

Packed with new features and functionality, the most noticeable update can be seen and experienced is the new GUI. Featuring a much more "iOS" look and feel and as smooth as butter. Along with this, Apple has introduced some security protection which prevents the writing to system's root volume. Since macOS Catalina, Apple has split the OS and user data into two volumes where the system volume is "read-only" by default which prevents modification of system root volume.

A very quick way to mount system volume was to use "sudo mount -uw /" in Terminal. However, with Big Sur, this doesn't works and the command throws an error. If you've attempted to make the root volume as writable using the command which works on macOS Catalina, you might be familiar with the following error.
Code:
mount_apfs: volume could not be mounted: Permission denied
mount: / failed with 66

With macOS Big Sur, Apple added some more protection and unfortunately the system root volume cannot be mounted. The error is very normal on Big Sur and the above command will not allow you to mount the system's root volume. In macOS Big Sur, the "System" directory has been completely sealed and it will not accept any changes. All the kexts which you used to install into S/L/E, now gets installed onto L/E instead. Even if you attempt to install Mojave or Catalina and you have some third party kexts on S/L/E and proceed with an update, the system will remove those kexts and you'll have those kexts in a folder at your Desktop after the upgrade. However, installing the same kexts to L/E directory will work and will load too. But there are kexts which must be installed in S/L/E to be particular and as Big Sur doesn't gives you the option, you're out of luck.

Why writing to System's Root Volume is Required?


The real question comes that why do you need to mount the system's root volume and modify it when Apple doesn't allows it? A simple answer is in some environments, this can be needed for some special purpose such as Hackintosh where you may have a need to modify the kexts in S/L/E directory or even for the real Mac users who are willing to run macOS Big Sur on their unsupported Macs.

Mounting System's Root Volume


Interestingly, there is an actual workaround for mounting the system's root volume and having write access to it. Where you can modify the files and make the changes. To enable write access onto your system's volume, follow the steps outlined below.

⚠️ WARNING:

Due to the update functionality in macOS Big Sur, changing the system volume can break OS updates. By using this guide, you understand all the risks involved and EliteMacx86 shall not be liable for any of the damages that might occur and takes no responsibility for any of your action. Please proceed with caution!

Creating Mount Point for the volume
The very first step is to create a mount point for the volume where the system's root volume will be mounted. To create the mount point, execute the commands below.

1. Open Terminal.
2. Type:
Code:
mkdir ~/livemount

Finding the required Disk Identifier
The next step is to find the target disk name for mounting. To find the disk name, follow the steps below.

1. Open Terminal.
2. Type:
Code:
diskutil list
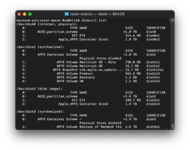
3. This will list all the connected drives on the system. You'll find something similar like the screenshot attached below. The disk name are hidden for the privacy reasons.

View attachment 3089

4. The /dev/disk2 is the actual disk and the capacity is 250GB. The APFS container has been created on disk2 as /dev/disk5 which is the system. A very quick way to determine the disk identifier is finding one with "synthesized" and look for the system's volume name. In our case, it's Macintosh HD, your's could be different from ours. Once you locate the volume name, just check for the identifier. In our case, the volume name is "Macintosh HD" and the identifier is "disk5s5" and that's the disk name we're looking for.

Mounting Drive
The next step is to mount the drive into the directory "livemount" we created in the very first step. To mount the drive, follow the steps below.

1. Open Terminal.
2. Type:
Code:
sudo mount -o nobrowse -t apfs  /dev/disk5s5 ~/livemount
3. You'll be prompted for the password. Simply enter your system's password and press enter.

Finding Mounted Volume
Now, as you have mounted the volume, you'll need to open the mounted volume for write access. To open the mounted volume, there are two ways.

1. Open Finder.
2. Type:
Code:
~/livemount

The other way is to manually find the path. The path for the mounted volume is
Macintosh HD/Users/Yourusername/Macintosh HD

Notes:
  • The Macintosh HD may differ from your actual system's volume name.
  • "Yourusername" is your user name.

Rebuilding Kernel Cache
If you have edited either S/L/Kernel, S/L/E directory, you'll also need to rebuild a kernel cache
Code:
sudo kmutil install --volume-root ~/livemount --update-all

Creating Snapshot
Once you have finished editing the system volume, you'll need to create a new snapshot. To create a new snapshot, follow the steps below.

1. Open Terminal.
2. Type:
Code:
sudo bless --folder ~/livemount/System/Library/CoreServices --bootefi --create-snapshot
Is there any way we can undo all these process..or delete this livemount and keep our root volume same safe un writabe as it was before??
 

Latest posts

Forum statistics

Threads
1,922
Messages
17,895
Members
27,672
Latest member
Imti