- Joined
- Jul 22, 2018
- Messages
- 9,395
- Motherboard
- Supermicro X11SPA-T
- CPU
- Intel Xeon W-3275 28 Core
- Graphics
- 2xAMD RX 580 8GB
- OS X/macOS
- 13.x
- Bootloader
- OpenCore (UEFI)
- Mac
- Mac mini
- MacBook Pro
- Mobile Phone
- Android
- iOS
How to Enable AMD Graphics in macOS
An EliteMacx86 Exclusive Guide - This guide covers the implementation of supported AMD GPU on macOS. By following this guide, you'll be able to enable AMD Graphics on macOS using Clover or OpenCore Bootloader with full QE/CI.Overview
Apple has been using a wide range of AMD Graphics Card for a long time. The good news is with the release of macOS version 10.12.6, the drivers for RX 470, RX 480, RX 570, and RX 580 are included. This means from macOS 10.12.6 and future macOS versions, we don’t need to perform any kext modifications to make AMD GPUs work in the build.With such good support for AMD GPUs, it's quite easy to get AMD graphic cards working on macOS Sierra 10.12.6 and later which requires only a few steps. The sleep/wake function also works normally without any restarts or crashes. Also, you don't need to use any helper cards or IGPU.
Before macOS Sierra version 10.12.6, it was quite difficult to get any AMD Cards working as it involved several steps to get it working with the right framebuffers which were too difficult for any beginner/new users. With this, it had a few restrictions and required a helper/secondary or IGPU(Intel HD Graphics) for the hardware acceleration.
Now you can run AMD graphics card natively without the need of installing any Drivers like NVIDIA and extra configuration. With the release of macOS High Sierra, a wide range of AMD graphics cards has been added and has better support than macOS Sierra in terms of AMD GPUs.
This method is easy to roll back and works after the update. Before using this guide, we recommend you to perform a clean installation of macOS.
Requirements
Following are the requirements for enabling AMD Graphics on macOS. Please ensure you meet the requirements before proceeding with this guide.| CPU | macOS compatible CPU. See CPU Compatibility for more information. AVX2 is required for native support of AMD GPUs. See CPUs with no AVX2 support for more information. |
| Graphics | macOS Compatible AMD GPU. See AMD Graphics Compatibility for more information. |
| Kexts | Original Graphics kexts in S/L/E |
| macOS Version | OS X Lion 10.7.5 and later |
| Tools |
|
For RX 6000 Series AMD NAVI GPU, see below:
GUIDE - How to Enable AMD RX 6800, RX 6800XT and RX 6900XT on macOS Big Sur and Later
How to Enable AMD RX 6600, RX 6600XT, RX 6800, RX 6800XT and RX 6900XT Graphics on macOS Big Sur and Later An EliteMacx86 Exclusive Guide - This guide covers the implementation of AMD Navi RDNA2 GPU on macOS Big Sur and later. By following this guide, you'll be able to achieve full QE/CI on your...
For AMD APU, see below:
GUIDE - How to Enable AMD Integrated Graphics (APU) on macOS [Clover/OpenCore]
How to Enable AMD Integrated Graphics (APU) on macOS [Clover/OpenCore] An EliteMacx86 Exclusive Guide - This guide describes how to enable AMD APU Graphics on macOS and is applicable to both, Clover and Opencore. By following this guide, you'll be able to achieve full QE/CI on your AMD CPU with...
CPUs with no AVX2 support, see below:
Starting with macOS Ventura, you'll require a CPU with AVX2 instruction support. This means you need atleast Haswell CPU in Intel lineup. Due to lack of AVX2 support on CPUs prior than Haswell, the AMD Graphics drivers won't load. If your CPU is prior than Haswell, follow the guide linked below:
Enabling AMD Graphics in macOS
Following are the steps to enable AMD graphics on macOS:STEP 1: Setup BIOS
The very first step is to set up BIOS to have the AMD GPU Enabled on your System. Follow the steps below to set up your BIOS for enabling AMD GPU.1. On your target computer, boot to BIOS. Refer to your motherboard's user manual for the BIOS Key.
2. Adjust the following settings described below:
| Settings | Value | Notes |
|---|---|---|
| Initial PCIe Output Display | PCIe/Auto/Enabled | Use one of the values available, depending on your BIOS options. This is usually present as VGA Priority on enterprise grade servers and workstations. |
| Intel Processor Graphics | Disabled/Enabled | If your processor has a compatible IGPU that is supported under macOS and you're using a compatible SMBIOS, then its recommended to set the IGPU to Enabled for the QuickSync feature. This is usually present as Internal Graphics option in BIOS. |
| CSM | Disabled | |
| PCIE ROM | UEFI/UEFI ROM only | This is usually present on enterprise grade servers and workstations and is available under PCIe/PCI/PnP Configuration option. |
| Above 4G Decoding | Enabled | If you're using an enterprise grade servers and workstation, it is recommended to Disable this option and use npci flag instead. |
| Re-Size BAR | Disabled | |
| Boot Mode Select | UEFI |
NOTES:
- The above settings are for Graphics only. See BIOS Settings for more information.
- If your system does not have any of the above settings in BIOS, ignore such settings.
- If your BIOS has Legacy Option ROMs, set it to UEFI/UEFI Only.
3. Save & Exit Setup
STEP 2: Cleanup old work
Once you have set up the BIOS, the next step is to remove the kexts, injections, and ACPI renames that can interfere with the Graphics implementation. To remove such, follow the steps below:
Kexts Removal
If you're using any of these kexts listed below, it is recommended to remove them. See notes below.1. Mount your ESP.
2. Remove the following kexts:
- IntelGraphicsFixup.kext
- NvidiaGraphicsFixup.kext
- CoreDisplayFixup.kext
- Shiki.kext
- IntelGraphicsDVMTFixup.kext
- AzulPatcher4600.kext
- AppleBacklightFixup.kext,
- FakePCIID_Intel_HD_Graphics.kext
- FakePCIID_Intel_HDMI_Audio.kext
- FakePCIID.kext
NOTES:
- If you're using OpenCore, you'll also need to remove the kext entries from your kernel section in your config.plist
- For macOS Catalina and prior, make sure these kexts don't exist in Library/Extensions or System/Library/Extensions.
- Do not remove FakePCIID.kext if you're using any other FakePCIID plugins.
Clover Properties and Injections
If you're using Clover, you need to disable Clover properties and injections.1. Mount your ESP.
2. Open your config.plist using any XML editor and disable and/or remove the following from their respective sections as described below:
Disable DSDT Fixes
The DSDT fixes can be disabled in
Acpi>Fixes section.- AddHDMI
- FixDisplay
- FixIntelGfx
- AddIMEI
- FixHDA
- AddPNLF
The Fake IDs can be disabled in the
Devices>Fake ID section.- ATI
- IntelGFX
- NVidia
- IMEI
The injection properties can be disabled in the
Devices>Properties section.- Inject
- UseIntelHDMI
- HDMIInjection
- SetIntelBacklight
- SetIntelMaxBacklight
The Graphics injection can be disabled in the Graphics section
- ATI
- Intel
- NVidia
The ig-platform-id can be removed in the Graphics section
ACPI Renames
If you're using any ACPI renames, you'll need to disable or delete the ACPI renames as these can conflict with WhateverGreen's automatic renames.1. Mount your ESP.
2. Open your config.plist using any XML editor and remove the following ACPI renames. For Clover, it's in
Acpi>DSDT>Patches section, and for OpenCore, it's under ACPI>Patch section:- GFX0 to IGPU
- PEGP to GFX0
- HECI to IMEI
- MEI to IMEI
- HDAS to HDEF
- B0D3 to HDAU
STEP 3: Adding Required Kexts
The next step is to add the required kexts to enable AMD Graphics. WhateverGreen doesn't work standalone. WhateverGreen and Lilu are needed together to work in conjunction in order to enable AMD Graphics and prevent any errors.1. Download WhateverGreen and Lilu from the downloads section of this forum.
2. Mount your ESP.
For Clover:
If you're using Clover, copy both the kexts to
EFI/Clover/Kext/OthersFor OpenCore:
If you're using OpenCore, copy both the kexts to
EFI/OC/Kexts. Open your config.plist using any XML editor and add
Lilu.kext, and WhateverGreen.kext entries in the Kernel>Add section of your config.plist:NOTES:
- Download the latest version for better support.
- Download only the RELEASE.zip file.
- If the kext is already present in the directory, replace them with a new version.
- Do not use WhateverGreen.kext.dSYM, WhateverName.app and Lilu.kext.dSYM.
STEP 4: Add Required Boot Args
Once you have added the kexts, the next step is to add the required boot args. To add the boot args, follow the steps below:For Clover:
Assuming the config.plist is still open, add
agdpmod=pikera to the Boot Arguments under the Boot>Argument section of your config.plist.For OpenCore:
Assuming the config.plist is still open, add
agdpmod=pikera to the boot-args key under the 7C436110-AB2A-4BBB-A880-FE41995C9F82 UUID list in the NVRAM section of your config.plist.NOTES:
This step is only required for AMD 5000 and 6000 series GPUs.
See Fixing Blackscreen if you're getting blackscreen on macOS Tahoe.
STEP 4: Restart your System
After performing all the above steps, restart your system for the applied changes to take effect. It is recommended to reset NVRAM twice at least.Verifying your Card
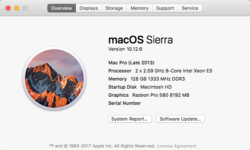
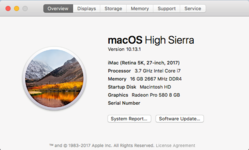
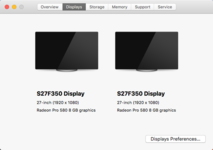
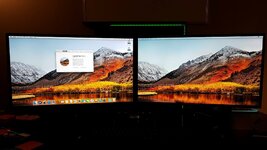
Look for the information of your card under About this Mac and verify the VRAM. For more information about your Card, navigate to System Information and navigate to Graphics/Displays Tab.NOTE:
|
Sample Attachment
The AMD RX580 from Sapphire and ASUS are used as examples in this guide.
Credits :
vit9696
Attachments

Last edited:

")