- Joined
- Jul 22, 2018
- Messages
- 9,282
- Motherboard
- Supermicro X11SPA-T
- CPU
- Intel Xeon W-3275 28 Core
- Graphics
- 2xAMD RX 580 8GB
- OS X/macOS
- 13.x
- Bootloader
- OpenCore (UEFI)
- Mac
- Mac mini
- MacBook Pro
- Mobile Phone
- Android
- iOS
How to Fix IRQ Conflicts on macOS [Clover/OpenCore]
This guide covers fixing of IRQ Conflicts on macOS, supported by Clover and OpenCore. By following this guide, you'll be able to patch out the IRQ Conflicts.
I. Overview
On a few systems, patching IRQ might be required and is required on almost all laptops. The IRQ patching is not required by every system, but mostly on OEM systems (such as Dell and HP). These fixes are needed mainly for onboard Audio/USB/Thunderbolt/FireWire. For a few systems, the RTC and HPET tend to take IRQs from other devices like USB and Audio and can prevent such devices from working under macOS/OS X and therefore you must patch out the IRQ conflicts in order to make those devices work under macOS/OS X. To patch the IRQ conflicts, follow the steps below.
II. Requirements
Following are the requirements for fixing IRQ Conflicts on macOS. Please ensure you meet the requirements before proceeding with this guide.
Method #1: Using Clover DSDT Fixes
Using Clover's DSDT Fixes, you can patch out the IRQ conflicts on the fly. However, this method is limited to Clover bootloader only. To patch the IRQs using the Clover's DSDT fixes method, follow the steps below.
1. Mount your ESP
2. Open your config.plist using any XML editor from the EFI/Clover directory.
3. Enable the following fixes under Acpi>Fixes section of your config.plist.
5. Restart your system for the applied changes to take effect. It is recommended to reset NVRAM twice at least.
Method #2: Using HotPatch
STEP 1: Extracting DSDT
The very first step is to extract your native DSDT for finding out the IRQ conflicts. We recommend it extracting using Clover, for the highest level of integrity. If you're not aware of how to do that, a guide is already available which is linked below.

 elitemacx86.com
STEP 2: Patching IRQ conflicts
Once you have extracted the native DSDT, the next step is to patch the IRQ. To patch IRQ, follow the steps below.
1. Install Command Line Tools, if you haven't already.
2. Open the Terminal and execute the following commands. When prompted, enter your password.
You'll see something similar to the following as an output of the operation:

3. Type


4. Drag and drop the DSDT that you created in step to the SSDTTime Terminal Window and press enter key. If you've extracted the ACPI files using Clover, you can also drop the origin folder here.

You'll see that the DSDT has been selected now. You can change the DSDT anytime, by pressing

5. Type

As you can see, the SSDTTime supports 4 ways of patching the IRQ conflicts.

Patching Options
Most of the Desktops (consumer series) can work with the default patching option. However, the default method may not work on all the systems as it will always patch 0, 8, and 11 from IPIC/TMR/RTC. Whereas for some systems, the IRQ number can be different and as a result, the default method will not work. In addition, most of the HEDT and Servers will require a custom format.
To patch your own list of Devices and IRQs, you can use the custom format using the syntax:
Once you have determined the Devices and the IRQ, you can simply patch the IRQ conflicts. In our case, TMR, PIC, and RTC0. Normally, you need to only patch these.
6. Using the above syntax, type the Devices and the IRQ. In our case, the command would be:

7. Once confirmed, press enter key to generate the patches. If you're on Big Sur or later, the Terminal may prompt for access. When prompted, click on OK to allow access

Now, the SSDTTime will generate the patches and you'll see the following as an output of the operation.

And the patches+SSDT in the Result folder which will automatically appear in Finder. You can find the patches at

8. Close the Finder window and in Terminal, press enter key to return to the main menu. Then, type


STEP 3: Installing SSDT
The next step is to install the SSDT for fixing the IRQ conflicts. Follow the steps below to install the SSDT.
1. Mount your EFI partition
2. Depending on your bootloader,
For Clover:
If you're using Clover, copy the
For OpenCore:
If you're using OpenCore, copy
STEP 4: Adding Renames
The next step is to add the renames for the patches. Follow the steps below to add the renames.
1. Assuming the ESP is still mounted,
For Clover:
If you're using Clover, add the ACPI renames from
For OpenCore:
If you're using OpenCore, add the ACPI renames from
2. Once you're done with the above steps, save your config.plist
STEP 5: Restarting your System
After performing all the above steps, restart your system for the applied changes to take effect. It is recommended to reset NVRAM twice at least.
Method #3: Using DSDT Patch
This method is easy but also requires some ACPI knowledge. To patch the IRQ using the DSDT method, follow the steps below
STEP 1: Extracting DSDT
The very first step is to extract your native DSDT for finding out the IRQ conflicts. We recommend it extracting using Clover, for the highest level of integrity. If you're not aware of how to do that, a guide is already available which is linked below.

 elitemacx86.com
STEP 2: Patching IRQ
Once you have extracted the native DSDT, the next step is to patch the IRQ. To patch IRQ, follow the steps below.
1. Download the MaciASL of your choice.
2. Extract the MaciASL and move it to the Applications folder.
3. Open your disassembled DSDT using MaciASL.

4. Click on the Patch button and you'll several patches available to apply in the left pane.

5. Find and select the

Once the patch is applied successfully, you'll see something like below.

6. Click on Close and you'll see something like below.

7. Click on compile and look for errors in the Compiler Summary. If there's an error, fix it and again click on Compile.


8. Save the DSDT using

9. A dialogue box will appear asking for the location and the file format to save the file. Select the location of your choice and select

STEP 2: Installing DSDT
The next step is to install the DSDT for fixing the IRQ conflicts. Follow the steps below to install the DSDT.
1. Copy the patched DSDT
2. Mount your EFI partition
3. Depending on your bootloader,
For Clover:
If you're using Clover, copy the patched DSDT to
For OpenCore:
If you're using OpenCore, copy the patched DSDT to
STEP 3: Restarting your System
After performing all the above steps, restart your system for the applied changes to take effect. It is recommended to reset NVRAM twice at least.
Verifying
IOReg
Verify the IOInterruptSpecifiers. The IOInterruptSpecifiers is under HPET node.
This guide covers fixing of IRQ Conflicts on macOS, supported by Clover and OpenCore. By following this guide, you'll be able to patch out the IRQ Conflicts.
I. Overview
On a few systems, patching IRQ might be required and is required on almost all laptops. The IRQ patching is not required by every system, but mostly on OEM systems (such as Dell and HP). These fixes are needed mainly for onboard Audio/USB/Thunderbolt/FireWire. For a few systems, the RTC and HPET tend to take IRQs from other devices like USB and Audio and can prevent such devices from working under macOS/OS X and therefore you must patch out the IRQ conflicts in order to make those devices work under macOS/OS X. To patch the IRQ conflicts, follow the steps below.
II. Requirements
Following are the requirements for fixing IRQ Conflicts on macOS. Please ensure you meet the requirements before proceeding with this guide.
| CPU |
|
| macOS |
|
| ACPI Renames |
|
| Tools |
|
Method #1: Using Clover DSDT Fixes
Using Clover's DSDT Fixes, you can patch out the IRQ conflicts on the fly. However, this method is limited to Clover bootloader only. To patch the IRQs using the Clover's DSDT fixes method, follow the steps below.
1. Mount your ESP
2. Open your config.plist using any XML editor from the EFI/Clover directory.
3. Enable the following fixes under Acpi>Fixes section of your config.plist.
- FixTMR
- FixRTC
- FixIPIC
- FixHPET
5. Restart your system for the applied changes to take effect. It is recommended to reset NVRAM twice at least.
Method #2: Using HotPatch
STEP 1: Extracting DSDT
The very first step is to extract your native DSDT for finding out the IRQ conflicts. We recommend it extracting using Clover, for the highest level of integrity. If you're not aware of how to do that, a guide is already available which is linked below.

GUIDE - How to Extract DSDT/SSDTs
How to Extract DSDT/SSDTs An EliteMacx86 Exclusive Guide - This guide covers the extraction of ACPI sets, (commonly known as DSDT and SSDTs) using Clover. Overview Extracting DSDT/SSDTs is very easy and has minimal requirements. To extract the DSDT/SSDT, follow the steps below. For Clover...
 elitemacx86.com
STEP 2: Patching IRQ conflicts
Once you have extracted the native DSDT, the next step is to patch the IRQ. To patch IRQ, follow the steps below.
1. Install Command Line Tools, if you haven't already.
2. Open the Terminal and execute the following commands. When prompted, enter your password.
Bash:
#Clone SSDTTime
git clone https://github.com/corpnewt/SSDTTime

#Move to the directory
cd SSDTTime

#Modify permission
chmod +x SSDTTime.command

#Run SSDTTime
./SSDTTime.command
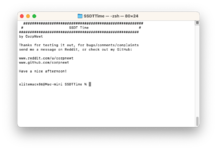
You'll see something similar to the following as an output of the operation:
Code:
Cloning into 'SSDTTime'...
remote: Enumerating objects: 354, done.
remote: Counting objects: 100% (117/117), done.
remote: Compressing objects: 100% (49/49), done.
remote: Total 354 (delta 97), reused 69 (delta 68), pack-reused 237
Receiving objects: 100% (354/354), 144.77 KiB | 716.00 KiB/s, done.
Resolving deltas: 100% (219/219), done.

Downloading iasl-stable
 - Found iasl-stable
   - Chmod +x
   - Copying to Scripts directory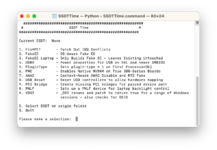
3. Type
D and press enter key to select the DSDT for finding out the IRQ conflicts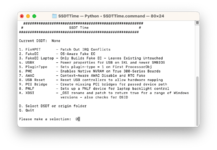
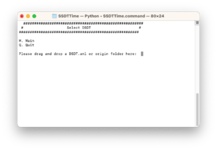
4. Drag and drop the DSDT that you created in step to the SSDTTime Terminal Window and press enter key. If you've extracted the ACPI files using Clover, you can also drop the origin folder here.
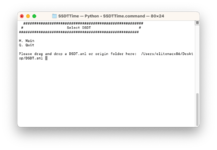
You'll see that the DSDT has been selected now. You can change the DSDT anytime, by pressing
D key.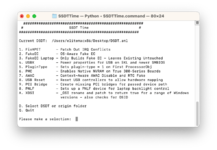
5. Type
1 to patch out the IRQ conflicts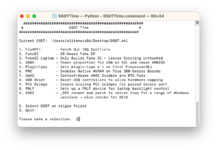
As you can see, the SSDTTime supports 4 ways of patching the IRQ conflicts.
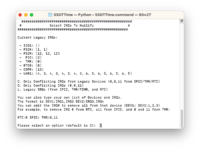
Patching Options
| Options | Notes |
|---|---|
| C | Only Conflicting IRQs from Legacy Devices (0,8,11 from IPIC/TMR/RTC) |
| O | Only Conflicting IRQs (0,8,11) |
| L | Legacy IRQs (from IPIC, TMR/TIMR, and RTC) |
Most of the Desktops (consumer series) can work with the default patching option. However, the default method may not work on all the systems as it will always patch 0, 8, and 11 from IPIC/TMR/RTC. Whereas for some systems, the IRQ number can be different and as a result, the default method will not work. In addition, most of the HEDT and Servers will require a custom format.
To patch your own list of Devices and IRQs, you can use the custom format using the syntax:
DEV1:IRQ1,IRQ2 DEV2:IRQ3,IRQ4, whereDEV1, and DEV2 represent the devicesIRQ represents the IRQ numberOnce you have determined the Devices and the IRQ, you can simply patch the IRQ conflicts. In our case, TMR, PIC, and RTC0. Normally, you need to only patch these.
6. Using the above syntax, type the Devices and the IRQ. In our case, the command would be:
TMR:0, PIC:2, RTC0:8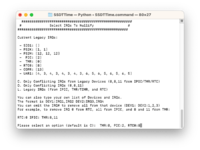
7. Once confirmed, press enter key to generate the patches. If you're on Big Sur or later, the Terminal may prompt for access. When prompted, click on OK to allow access
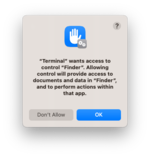
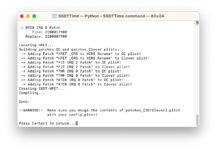
Now, the SSDTTime will generate the patches and you'll see the following as an output of the operation.
And the patches+SSDT in the Result folder which will automatically appear in Finder. You can find the patches at
/yourusername/SSDTTime/Results for latter use.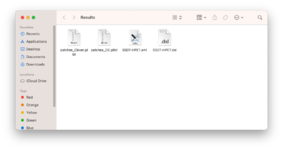
8. Close the Finder window and in Terminal, press enter key to return to the main menu. Then, type
Q and press enter key to quit the SSDTTime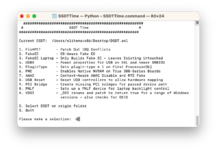
STEP 3: Installing SSDT
The next step is to install the SSDT for fixing the IRQ conflicts. Follow the steps below to install the SSDT.
1. Mount your EFI partition
2. Depending on your bootloader,
For Clover:
If you're using Clover, copy the
SSDT-HPET.aml from the directory /yourusername/SSDTTime/Results to EFI/Clover/ACPI/patched directory.For OpenCore:
If you're using OpenCore, copy
SSDT-HPET.aml from the directory /yourusername/SSDTTime/Results to EFI/OC/ACPI directory. You'll also need to add the ACPI entries in ACPI>Add section of your config.plist.STEP 4: Adding Renames
The next step is to add the renames for the patches. Follow the steps below to add the renames.
1. Assuming the ESP is still mounted,
For Clover:
If you're using Clover, add the ACPI renames from
patches_Clover.plist to Acpi>DSDT section of your config.plist.For OpenCore:
If you're using OpenCore, add the ACPI renames from
patches_OC.plist to ACPI>Patch section of your config.plist.2. Once you're done with the above steps, save your config.plist
STEP 5: Restarting your System
After performing all the above steps, restart your system for the applied changes to take effect. It is recommended to reset NVRAM twice at least.
Method #3: Using DSDT Patch
This method is easy but also requires some ACPI knowledge. To patch the IRQ using the DSDT method, follow the steps below
STEP 1: Extracting DSDT
The very first step is to extract your native DSDT for finding out the IRQ conflicts. We recommend it extracting using Clover, for the highest level of integrity. If you're not aware of how to do that, a guide is already available which is linked below.

GUIDE - How to Extract DSDT/SSDTs
How to Extract DSDT/SSDTs An EliteMacx86 Exclusive Guide - This guide covers the extraction of ACPI sets, (commonly known as DSDT and SSDTs) using Clover. Overview Extracting DSDT/SSDTs is very easy and has minimal requirements. To extract the DSDT/SSDT, follow the steps below. For Clover...
 elitemacx86.com
STEP 2: Patching IRQ
Once you have extracted the native DSDT, the next step is to patch the IRQ. To patch IRQ, follow the steps below.
1. Download the MaciASL of your choice.
2. Extract the MaciASL and move it to the Applications folder.
3. Open your disassembled DSDT using MaciASL.
4. Click on the Patch button and you'll several patches available to apply in the left pane.
5. Find and select the
IRQ Fix patch from the left pane and click on Apply.Once the patch is applied successfully, you'll see something like below.
6. Click on Close and you'll see something like below.
7. Click on compile and look for errors in the Compiler Summary. If there's an error, fix it and again click on Compile.
8. Save the DSDT using
File>Save As option.9. A dialogue box will appear asking for the location and the file format to save the file. Select the location of your choice and select
ACPI Machine Language Binary in the File Format option and click on Save.STEP 2: Installing DSDT
The next step is to install the DSDT for fixing the IRQ conflicts. Follow the steps below to install the DSDT.
1. Copy the patched DSDT
2. Mount your EFI partition
3. Depending on your bootloader,
For Clover:
If you're using Clover, copy the patched DSDT to
EFI/Clover/ACPI/patched directory.For OpenCore:
If you're using OpenCore, copy the patched DSDT to
EFI/OC/ACPI directory. You'll also need to add the ACPI entries in ACPI>Add section of your config.plistSTEP 3: Restarting your System
After performing all the above steps, restart your system for the applied changes to take effect. It is recommended to reset NVRAM twice at least.
Verifying
IOReg
Verify the IOInterruptSpecifiers. The IOInterruptSpecifiers is under HPET node.
Last edited:
