- Joined
- Jul 22, 2018
- Messages
- 9,295
- Motherboard
- Supermicro X11SPA-T
- CPU
- Intel Xeon W-3275 28 Core
- Graphics
- 2xAMD RX 580 8GB
- OS X/macOS
- 13.x
- Bootloader
- OpenCore (UEFI)
- Mac
- Mac mini
- MacBook Pro
- Mobile Phone
- Android
- iOS
A Beginner's Guide: How to Patch AppleHDA for Laptops
OverviewAudio is an essential component of any system and it needs to be enabled. There are several ways to enable audio on the hardware. But those are not recommended when using a laptop. The following is a guide for patching AppleHDA for laptops.
On some audio codecs, it can give a kernel panic or crashes. There are several advantages when using AppleHDA. Before using this guide, we recommend you to perform a clean installation of macOS.
Requirements
Following are the requirements for this guide.
| macOS/OS X Versions | 10.14.x, 10.13.x, 10.12.x, 10.11.x |
| Supported Vendors | Realtek, Conexant, IDT, Cirrus Logic, VIA VT |
| AppleHDA | Vanilla/Original AppleHDA in /S/L/E |
Patching AppleHDA for any codec is a complex process and is time consuming. Mirone has developed an Application for patching AppleHDA. The Application supports Desktop and Laptop segments including a number of codecs. But this guide is about patching AppleHDA on laptops.
Before you start
NOTES:
|
Patching AppleHDA
Now, you have enough information about AppleHDA. To patch AppleHDA, follow the steps outlined below.
STEP 1: Getting Codec Information
The very first step is to get the codec information. Getting codec information is necessary as without knowing the audio codec, it will create chaos while following the guide as each codec is unique and needs different edits. To get the codec information, follow the steps below.
- The easiest method to obtain the codec information is to visit your motherboard manufacturer site and look for the Audio information under the specification section.
- Use DPCIManager and look for the codec information under status tab.
- Use a Linux or Ubuntu and in terminal, type :
Code:
cat /proc/asound/card0/codec#1 > ~/Desktop/codec_dump.txtCode:
Code:
cat /proc/asound/card0/codec#0 > ~/Desktop/codec_dump.txtSTEP 2: Download AppleHDA Patcher
The next step is to download the AppleHDA patcher and then patch the AppleHDA for specific codec
Downloads
- AppleHDA Patcher (v1.8)
- MaciASL
- Download the latest version for better support.
- Extract the App to your Desktop
- Open the App
- Under the Laptop sections, select your Audio Codec
- Click on patch AppleHDA
- Now, under Find, select the Audio Device
- To find the Audio Device, use DPCIManager
- If you find no audio device, select Skip
- Click on patch
- And the AppleHDA Patcher will patch a AppleHDA for the selected Codec
Code:
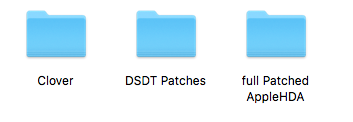
/Desktop/MironeAudioThere you'll find three respective folders

The Clover contains:
- aDummyHDA.kext
- config.plist
- HDEF_Patch
- System_IRQ
- AppleHDA.kext
1. After patching the AppleHDA, the next step is to rename the audio device and set the device id to enable audio.
2. Open your config.plist file
3. Navigate to the Acpi tab and add the following patch in DSDT, patches section of your config.plist.
Code:
Comment: Rename HDAS to HDEF
Find* [HEX]: 48444153
Replace [HEX]: 48444546Layout IDs
Use Layout ID=3
NOTES:
|
STEP 4: Installing the Kext
- Copy the AppleHDA.kext to your Desktop.
- Install it using Terminal or any kext installer such as Kext Utility.
Code:
sudo cp -R /Users/yourusername/Desktop/AppleHDA.kext /System/Library/Extensions- After installing the AppleHDA.kext, build the caches using
Code:
sudo kextcache -i /- Restart your laptop
NOTES:
|
STEP 5: Setting Audio Output/Input
After restarting your system, you'll need to setup audio output and input through your rear audio jack located at back panel and headphones jack located at the front panel. You will need to set your output device to Internal Speakers for sound to work.
- Open System Preferences
- Select Sound
- Under Sound Effects tab, select
- Play feedback when volume is changed
- Select Show volume in menu bar
- Click on Output
- Select Internal Speakers
- When using Headphones, the Output is automatically switched to Headphones.
Details:
- Audio Codec
- macOS version
- Copy of IOReg
- Installed AppleHDA.kext or aDummyHDA.kext
- DPCIManager/Status
- System Information/Hardware/Audio (All the available Devices)
- System Preferences/Sound/Output
- System Preferences/Sound/Input
- Compress EFI/Clover, exclude the themes folder. Do not include complete EFI folder.
Credits :
Mirone
Micky1979
Last edited:
